

Common Drone Photography Mistakes: How to Elevate Your Aerial Imagery in 2026
The most advanced camera system in the world cannot compensate for a fundamental misunderstanding of light, composition, and aviation discipline. You likely recognize the sinking feeling of reviewing your SD card only to find dull colours, blurry edges, or a sky that's completely washed out. It's a common frustration to see your vision for a perfect aerial shot fall flat because of common drone photography mistakes that plague even experienced pilots. Even with the 100MP Hasselblad sensors available in 2026, professional results require more than just pressing a button.
We understand you want to produce consistent, high-quality imagery while maintaining total confidence in your flight safety and compliance. This guide provides the technical solutions needed to correct frequent errors and elevate your portfolio. You'll learn how to master manual settings, refine your framing, and navigate the complexities of Transport Canada regulations without fear. We'll break down the technical, compositional, and legal barriers that prevent your photos from reaching their full potential so you can fly with the authority of a seasoned professional.
Key Takeaways
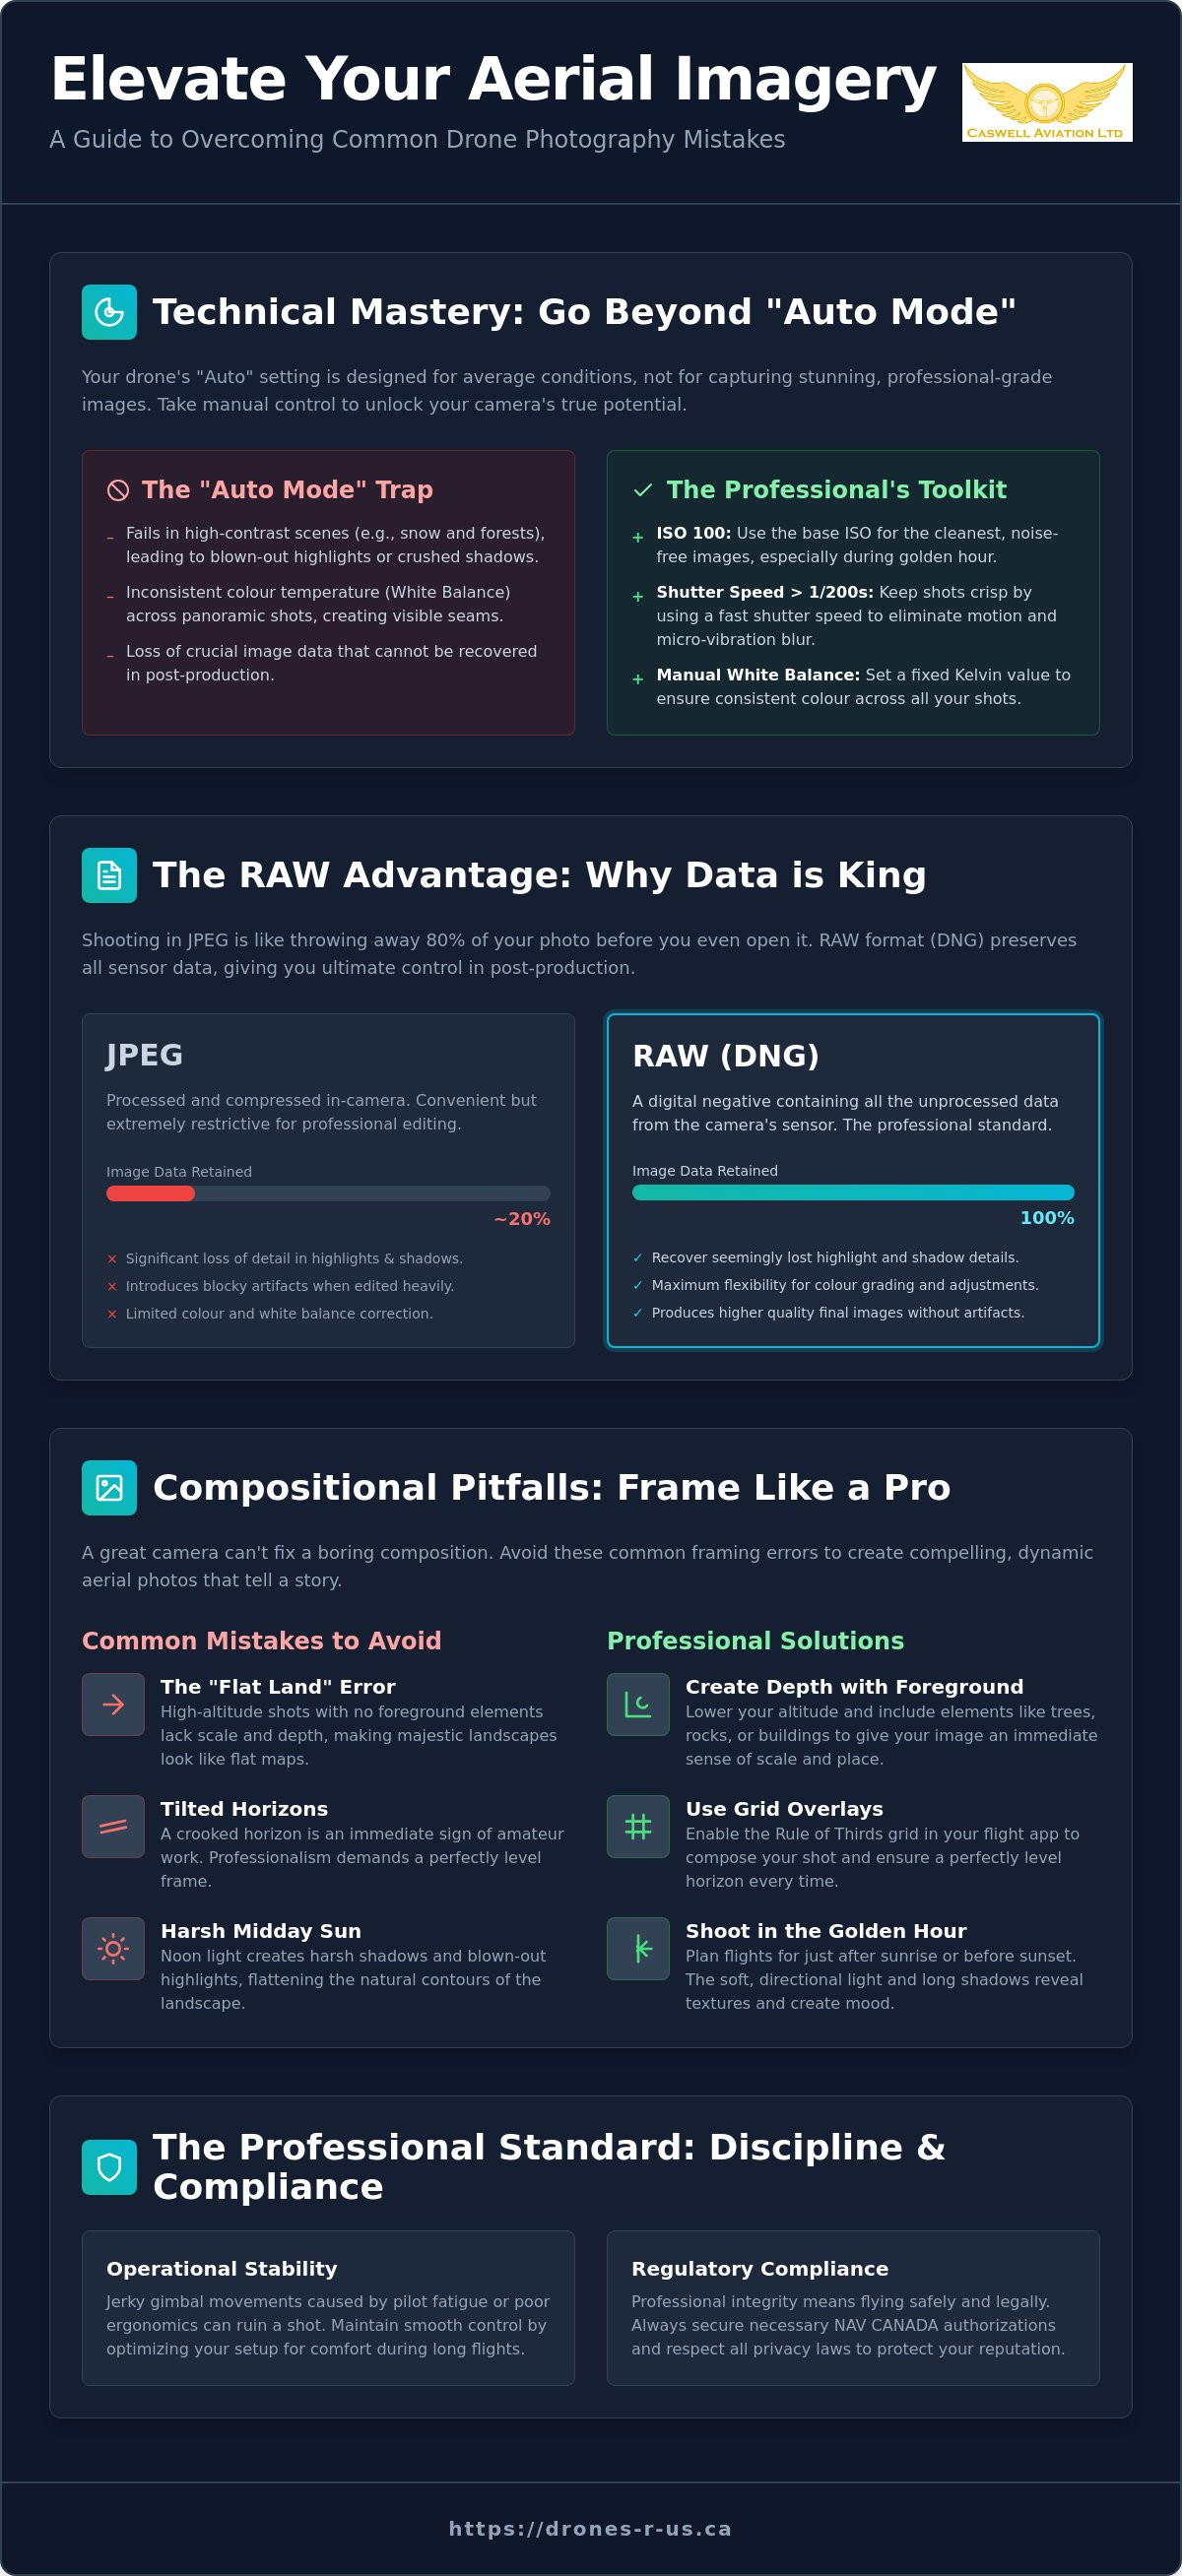
- Transition from Auto mode to manual controls and shoot in RAW format to preserve colour depth and detail in challenging light conditions.
- Avoid common drone photography mistakes like flat perspectives by integrating foreground elements and utilizing grid overlays for level horizons.
- Maintain professional integrity by securing necessary NAV CANADA authorizations and respecting privacy laws to protect your reputation and career.
- Enhance image stability by optimizing pilot ergonomics and controller handling to eliminate jerky gimbal movements caused by fatigue.
- Recognize how professional training and flight reviews provide the operational discipline required to move beyond hobbyist results.
Technical Setting Blunders: Why "Auto Mode" is Killing Your Quality
Relying on your drone's internal computer to make creative decisions is one of the most common drone photography mistakes. While modern flight controllers are engineering marvels, their exposure algorithms are designed for average conditions. When you fly over high-contrast Canadian landscapes, such as a dark pine forest against a brilliant snow-covered peak, the "Auto" setting often fails. It typically overexposes the snow to compensate for the dark trees, resulting in a loss of texture that no amount of editing can fix. Professional results require you to take command of the exposure triangle.
White balance is another critical setting often left to chance. If you're shooting a multi-shot panorama, Auto White Balance (AWB) might shift the colour temperature between frames as the camera moves from the sun toward the shade. This creates visible "seams" and inconsistent hues that ruin the final stitch. Since the early history of aerial photography, capturing clear images from a moving platform has also required precise shutter speed management. On a drone, vibration from the motors and wind resistance can introduce micro-blur. As a rule of thumb, keep your shutter speed at 1/200th of a second or faster to ensure your stills remain crisp, even in moderate gusts.
The RAW Advantage in Post-Production
JPEG files are processed in-camera, which discards roughly 80% of the data the sensor actually captured. For professional results, you must switch to RAW (DNG) format. This is particularly vital in Canada, where overcast skies and snow create complex white-on-white textures. RAW files allow you to recover highlights and lift shadows without introducing the blocky artifacts seen in compressed JPEGs. To stay organized, we recommend a file structure that separates your DNG masters from your proxy JPEGs, ensuring your professional editing workflow remains efficient and scalable.
Mastering Manual Exposure for Aerial Environments
Professional pilots use the histogram as their primary guide. This graphical representation of light distribution ensures you aren't "clipping" your highlights. If the graph touches the far right edge, you've lost data in the brightest parts of your image. Keeping your ISO at a fixed base level, usually ISO 100, is the best way to ensure your images remain crisp and free of digital noise during golden hour sessions. When you need to maintain a specific shutter speed for motion blur or exposure balance, utilize ND filters to manage the light hitting the sensor rather than relying on the drone's digital "cheats." Understanding these fundamentals is a core part of the Online Drone Courses and InPerson Training we provide to help pilots transition from hobbyist to professional standards.
By avoiding these common drone photography mistakes and taking manual control, you ensure that every flight produces usable, high-grade assets. The goal is to spend less time fixing errors in post-production and more time capturing the unique perspectives that only aerial platforms can provide.
Compositional Pitfalls: Moving Beyond the "Boring" Bird’s-Eye View
One of the most common drone photography mistakes is the "Flat Land" error, where a pilot flies at maximum altitude without considering foreground elements. High-altitude shots often lack a sense of scale, making majestic Canadian forests look like patches of moss. To fix this, lower your altitude and include a tree branch, a rock formation, or a building in the foreground. This creates an immediate sense of place and size. Additionally, always enable your grid overlay in your flight app. A horizon tilted by even two degrees is an immediate indicator of amateur work. Professionalism requires a level frame, regardless of wind conditions or gimbal drift.
Professional aerial work often requires adhering to international standards for consistency and safety. If you are a Canadian pilot looking to work on cross-border projects or simply want to align with global best practices, understanding the FAA Part 107 rules is as vital as mastering your camera. Consistency across different regulatory and geographic landscapes defines a master practitioner in this field.
Creating Dimension and Depth
Leading lines are essential for guiding the viewer. Use a winding road, a shoreline, or a river to draw the eye from the bottom of the frame toward the horizon. This creates a visual journey. Follow the "Foreground-Middle-Background" rule by positioning your drone so that a cliff edge is in the front, a valley is in the middle, and mountains are in the distance. This layering transforms a two-dimensional image into a three-dimensional experience for the viewer.
The Importance of Subject Selection
A beautiful landscape is not a subject; it is a setting. You must identify a specific focal point, such as a lone lighthouse, a bridge, or a specific bend in a river. Use the Rule of Thirds to place this subject off-centre, creating a more dynamic and balanced feel. If you find yourself struggling to identify a clear subject in a vast landscape, reviewing high-quality Drone Aerial Photography and Video can help you understand how professionals isolate points of interest within complex environments. Look for geometric shapes like circles and triangles found naturally in the Canadian landscape to anchor your shots.
Regulatory Oversight: How Compliance Errors Ruin Professional Imagery
Technical mastery and creative vision are secondary to the legal right to fly. Ignoring the regulatory framework is among the most damaging and common drone photography mistakes made by emerging professionals. A stunning aerial shot is worthless if it results in a heavy fine from Transport Canada or a lawsuit for trespassing. Professionalism in 2026 requires a disciplined approach to airspace, where "getting the shot" never takes precedence over aviation law. If you operate in controlled zones without NAV CANADA authorization, you risk your pilot certificate and your reputation with commercial clients who demand strict compliance.
Privacy and trespassing are equally critical. Flying over private property to capture a specific angle can lead to legal ramifications that far outweigh the value of the image. Furthermore, pilots often fall into the "screen trap," where they stare at their tablet for composition and lose Visual Line of Sight (VLOS). This is a significant safety violation. Maintaining a clear view of your aircraft ensures you can react to low-flying manned aviation or sudden bird strikes. A disciplined pre-flight plan, which includes checking for NOTAMs (Notices to Air Missions) and local flight restrictions via specialized apps, is a mandatory step for every professional mission.
Navigating Transport Canada Requirements
The distinction between Basic and Advanced operations is fundamental for any Canadian pilot. Basic operations are generally limited to uncontrolled airspace and require staying 30 metres away from bystanders. If your work involves urban photography or flying near airports, obtaining a Transport Canada drone certification for Advanced operations is essential. This allows you to fly in controlled airspace with proper authorization and operate closer to people. Keeping a meticulous flight log is also necessary. It provides a paper trail of professional diligence that protects you during audits or insurance claims.
Safe Operations in Public Spaces
Operating in public requires a calculated approach to lateral distance. You must ensure your aircraft remains at a legal distance from anyone not involved in the operation. In complex environments, employing a visual observer allows the pilot to focus on the camera while another set of eyes monitors the surrounding airspace. When curious onlookers approach, engage them with professional confidence. Explaining your safety protocols and certification status usually alleviates concerns and reinforces your image as a "Master Practitioner" rather than a hobbyist. These habits prevent common drone photography mistakes that stem from poor situational awareness and lack of planning.
The Physical Factor: Stability, Fatigue, and Pilot Ergonomics
Physical stability starts on the ground, not in the air. One of the most overlooked common drone photography mistakes is ignoring the pilot's own ergonomics during a mission. When you spend hours staring at a screen, neck strain and hand cramps are almost inevitable. This physical fatigue leads directly to jerky gimbal movements and imprecise framing. You might also find yourself falling into the "Death Grip" error. This occurs when you over-tighten your hold on the control sticks, which prevents the fluid, subtle pans required for professional-grade shots. Smooth imagery requires relaxed, steady hands and a stable stance.
Environmental factors also impact your physical performance. Failing to use a monitor hood or a high-brightness display leads to squinting. This increases eye strain and makes it nearly impossible to judge exposure or focus accurately in the field. Poor power planning is another physical stressor that ruins shots. If you're constantly checking a critically low battery percentage, you'll likely rush the composition and miss the perfect light. A professional pilot manages their own energy and their equipment's power with equal discipline to ensure they are ready when the "hero shot" presents itself.
The Role of Ergonomic Gear
Maintaining precision during long shoots requires the right support systems. A drone harness for smart controller is an essential tool for any serious aerial photographer. By distributing the weight of the remote across your shoulders rather than your wrists, you preserve the fine motor control needed for micro-adjustments. This reduction in physical stress is vital for multi-hour commercial photography sessions where consistency is the primary metric of success. Using a harness allows you to keep your hands light on the sticks for better tactile feedback.
Precision Control Techniques
Your choice of control style significantly impacts your final results. While many hobbyists use only their thumbs, the "Pinch" style, which uses both the thumb and index finger, often provides superior feedback for complex manoeuvres. You should also adjust your RC stick sensitivity, known as EXPO settings, in your flight app. Lowering these values creates a "softer" centre on the sticks. This makes it much easier to execute the smooth, slow camera movements that define high-end cinematography. Using a dedicated smart controller with tactile buttons is always preferable to a mobile phone, as it eliminates the ergonomic limitations and glare issues of a standard touchscreen.
Mastering the physical aspects of flight is just as important as understanding your camera settings. To refine your handling and eliminate these common drone photography mistakes, explore our Online Drone Courses and InPerson Training options today.
Moving Beyond the Hobbyist: Professional Training and Certification
A portfolio of stunning images is a prerequisite for any aerial photographer, but it's rarely enough to secure high-value contracts. If you are starting a drone pilot jobs Canada search, you'll quickly realize that commercial clients prioritize safety and legal compliance over artistic flair. Moving beyond the hobbyist stage means treating your operations with the discipline of a commercial aviator. This transition involves identifying and correcting common drone photography mistakes that stem from a lack of formal training, such as poor risk assessment or inadequate site surveys. Professionalism requires a shift in focus from the "shot" to the "system."
A professional flight review is one of the most effective ways to refine your operational habits. While many pilots view the review as a hurdle to overcome, it's actually a vital diagnostic tool. An experienced reviewer can spot subtle errors in your flight path or emergency procedures that you might have overlooked. Transitioning from recreational flying to a Level 1 Complex certification requires this level of scrutiny. It ensures that you aren't just a drone owner but a qualified pilot capable of operating in demanding environments. Staying current with the latest drone regulations Canada 2024 is a continuous responsibility. Laws evolve as technology advances; a professional must remain informed to protect their business and their certificate.
Investing in Formal Education
Structured online drone courses accelerate the learning curve by providing a methodical syllabus that covers everything from meteorology to radio procedures. While self-teaching is possible, it often leaves gaps in your knowledge that lead to common drone photography mistakes in the field. In-person training remains the gold standard for mastering advanced flight manoeuvres and gimbal control. These sessions provide immediate feedback that you can't get from a screen. Preparing for the Advanced RPAS exam is a rigorous process, but it's the key to unlocking restricted locations and higher-paying commercial opportunities.
Building a Professional Workflow
Professionalism is defined by repeatability. You must develop a comprehensive pre-flight and post-flight checklist that covers equipment health, weather minimums, and data redundancy. Networking with other certified pilots allows you to share technical insights and stay updated on industry trends. When you present your aerial imagery to high-end commercial clients, you should be able to provide not just the final files, but also proof of your authorization and safety logs. This level of transparency builds trust. It separates the master practitioner from the enthusiast and ensures your results are consistent, safe, and legally sound.
Elevating Your Aerial Perspective for 2026
Mastering aerial imagery in 2026 requires a synchronized approach to technical camera control, creative composition, and strict regulatory adherence. You've learned that moving away from automatic settings and prioritizing pilot ergonomics are just as vital as following Transport Canada protocols. By systematically identifying and correcting these common drone photography mistakes, you ensure that every flight delivers professional-grade results that meet the highest industry standards.
True expertise is built on a foundation of disciplined practice and formal education. We offer comprehensive support through Transport Canada Advanced and Level 1 Complex training, Professional Flight Reviews, and Expert Aerial Imagery Solutions. This structured path allows you to transition from recreational flying to a career defined by precision and safety. Taking the time to invest in your skills today ensures your longevity in a rapidly evolving sector.
Explore our Professional Drone Courses and Flight Reviews to refine your operational habits and secure your standing in the competitive Canadian market. The sky is no longer the limit when you fly with the confidence of a master practitioner.
Frequently Asked Questions
What is the most common mistake beginners make in drone photography?
Relying on "Auto Mode" is the most frequent error beginners commit. This often leads to overexposed skies or muddy shadows because the camera's internal computer averages the exposure for the entire scene. Taking manual control of your ISO and shutter speed allows you to balance high-contrast Canadian landscapes effectively. This shift in control is the first step toward producing professional results.
Do I need a special licence to take drone photos in Canada?
You require a Pilot Certificate from Transport Canada if your drone weighs between 250 grams and 25 kilograms. Pilots must pass an online exam for Basic operations or a flight review for Advanced certification. Operating without these credentials is one of the more serious common drone photography mistakes that can lead to significant legal penalties and insurance complications.
Why are my drone photos blurry even when the lighting is good?
Blurry images are usually the result of a shutter speed that is too slow to compensate for aircraft movement and motor vibration. Even in bright light, your drone's gimbal might experience micro-vibrations from wind resistance or aggressive manoeuvres. Ensure your shutter speed is set to at least 1/200th of a second to lock in sharpness across the entire frame.
Is it better to shoot drone photos in JPEG or RAW format?
Shooting in RAW (DNG) format is essential for professional-grade aerial photography. RAW files preserve all the data captured by the sensor, whereas JPEGs are compressed and discard vital information. This extra data is necessary for recovering details in bright clouds or dark forests during post-production. It gives you the flexibility needed to handle the dynamic range of Canadian environments.
How do I avoid a skewed horizon in my aerial shots?
Enable the grid overlay in your flight app to align the horizon with the horizontal lines on your screen. If the horizon remains tilted despite these guides, you may need to perform a manual gimbal calibration on a level surface. Correcting this is vital, as skewed horizons are common drone photography mistakes that immediately signal a lack of technical discipline to clients.
Can I fly my drone over people to get a better photography angle?
You cannot fly over bystanders unless you hold an Advanced Pilot Certificate and your drone has the appropriate safety declaration from the manufacturer. For Basic operations, you must maintain a minimum lateral distance of 30 metres from any person not involved in the flight. Prioritizing a photography angle over bystander safety is a major regulatory violation that risks your certification.
What is the best time of day for drone photography in Canada?
The "Golden Hour" shortly after sunrise or before sunset is the optimal time for aerial work. During these periods, the low angle of the sun creates long shadows that reveal the texture and depth of the terrain. Midday sun is generally too harsh and creates unflattering, flat lighting that hides the natural contours of the landscape and blows out highlight details.
How does a drone harness help with photography?
A drone harness improves your stability by distributing the weight of the controller across your shoulders rather than your wrists. This setup reduces hand fatigue and physical strain, allowing you to maintain the light touch required for smooth gimbal pans and precise framing. It is a vital ergonomic tool for long commercial missions where physical comfort directly impacts image quality.
Leave a comment