

Advanced Drone Photography: Professional 2026 Guide
Why do your high-resolution aerial shots often feel like amateur snapshots despite flying a $3,000 DJI Mavic 4 Pro? It's a common frustration for many pilots who find that expensive gear doesn't automatically translate to cinematic excellence. You likely find it difficult to manage exposure in high-contrast Canadian landscapes or feel discouraged by jerky gimbal movements that break the viewer's immersion. Mastering advanced drone photography techniques requires moving beyond the "Auto" button and developing a disciplined approach to both flight and light.
We understand that professional results depend on the intersection of technical precision and physical control. The gear is only half the story. This guide provides the framework to elevate your imagery from simple captures to professional-grade masterpieces. You'll learn how to achieve crisp, high-dynamic-range images and execute fluid flight paths that stand out in a competitive market. We'll cover essential camera configurations, the benefits of ergonomic Fitek Gear harnesses, and the specific manoeuvres needed to maintain Transport Canada professional standards during complex operations.
Key Takeaways
- Master manual camera settings and RAW formats to unlock professional-grade post-processing and high-fidelity aerial imagery.
- Elevate your cinematic output by mastering advanced drone photography techniques like the parallax effect and smooth orbit manoeuvres.
- Shift your perspective with advanced composition strategies, including top-down nadir geometry and the effective use of leading lines.
- Enhance flight precision and reduce pilot fatigue during complex shoots by utilizing ergonomic Fitek Gear harnesses for smart controllers.
- Align your creative workflow with Transport Canada professional standards to ensure safety and regulatory compliance for every mission.
Mastering Manual Camera Settings for High-Fidelity Aerials
Relying on automatic settings often limits your creative potential and leads to inconsistent results. Professional aerial work requires manual override to manage the specific challenges of Canadian environments. These advanced drone photography techniques ensure your output remains consistent regardless of changing light conditions or complex subject matter. Technical mastery starts with understanding how to manipulate your camera’s sensor to capture the maximum amount of data possible.
The Power of RAW and Manual White Balance
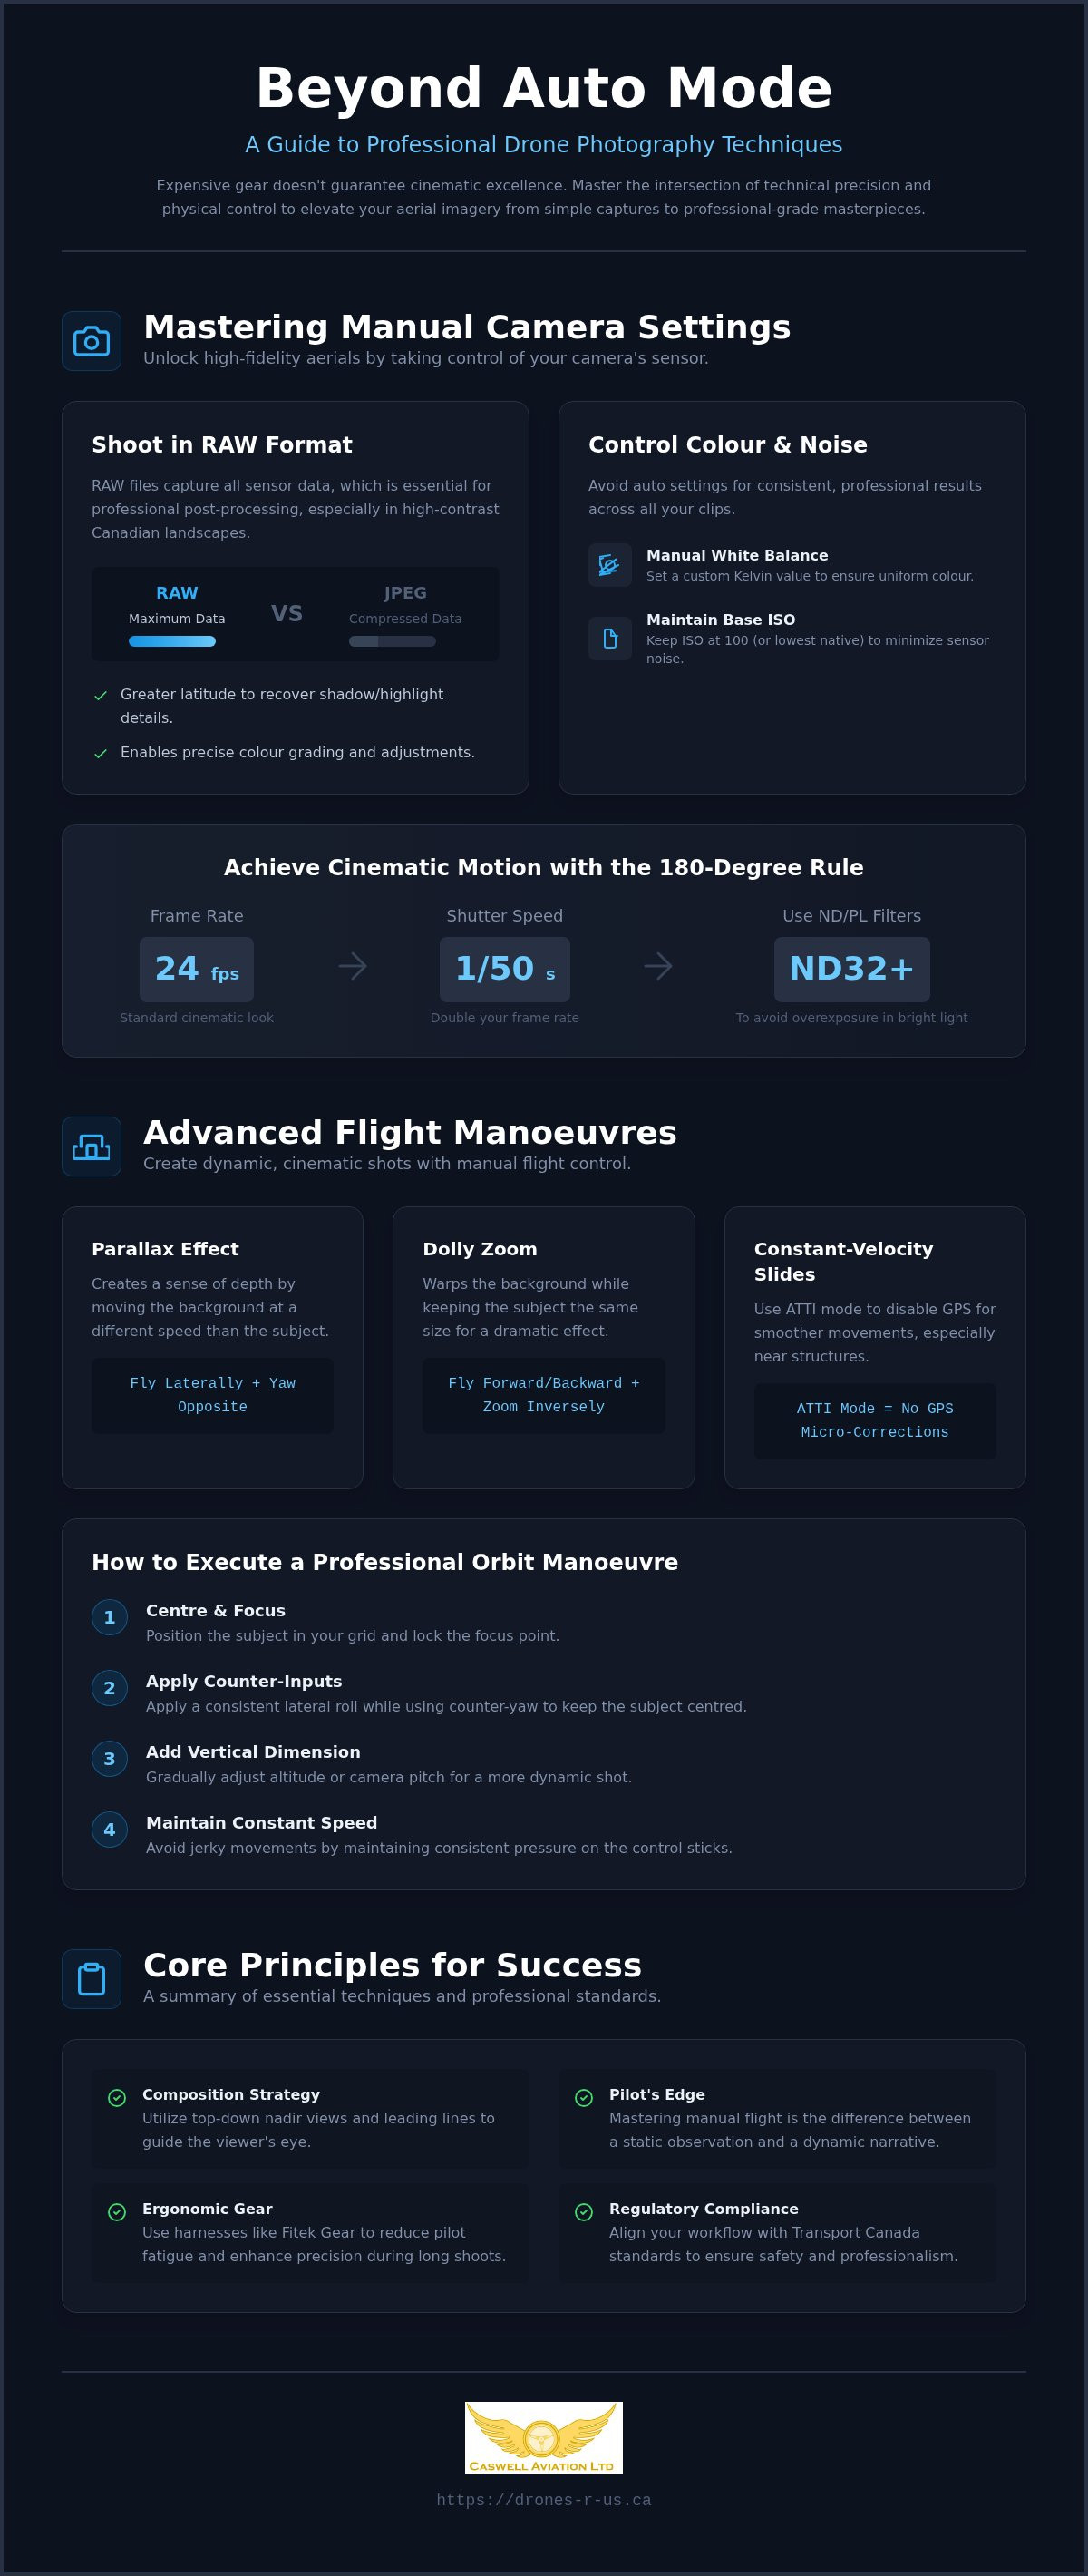
Shooting in RAW is a standard requirement for any professional workflow. RAW files capture the full data from the sensor, providing the latitude needed to recover details in shadows or highlights during post-production. This is vital when shooting high-contrast scenes like the Canadian Rockies or urban centres. You should also avoid Auto White Balance. It often shifts between battery swaps or as the sun moves. Setting a custom Kelvin value ensures your colours remain uniform across your entire project. This practice simplifies your colour grading process and maintains a professional look across multiple clips.
Managing Sensor Noise and Exposure
Managing the ISO-to-noise ratio is critical on 1-inch or 4/3 sensors. While these sensors are powerful, they exhibit visible grain when pushed past ISO 400 or 800. Keep your ISO at the base level whenever possible. Use your histogram to monitor exposure in real-time. In snow-covered landscapes or bright water scenes, the histogram helps you realize when you are clipping highlights. Aim to "expose to the right" without hitting the edge of the graph to preserve maximum data in your highlights without losing detail to pure white.
Leveraging ND Filters for Motion Blur
Achieving cinematic motion requires adherence to the 180-degree rule. This means your shutter speed should be double your frame rate. For example, if you shoot at 24fps, your shutter should be 1/50th of a second. In the bright Canadian winter sun, you will need Neutral Density (ND) filters to achieve this without overexposing. High-strength filters like ND32 or ND64 are often necessary. Polarizing (PL) filters are equally useful for the following reasons:
- They cut glare on lakes and rivers to reveal underwater textures.
- They reduce reflections on glass buildings in urban environments.
- They increase colour saturation in the sky and foliage.
Implementing these advanced drone photography techniques, such as using high-strength ND filters, allows you to realize the "dreamy" water effect through long exposure aerials, a hallmark of high-end landscape photography.
Advanced Flight Manoeuvres for Dynamic Cinematography
While automated flight modes offer convenience, they often lack the organic, fluid feel required for high-end cinema. Professional pilots rely on manual advanced drone photography techniques to achieve shots that feel intentional and reactive. Mastering these movements requires high-level muscle memory and an understanding of how multi-axis input translates to screen movement. It's the difference between a static observation and a dynamic narrative.
Positioning your aircraft in complex environments sometimes requires switching to ATTI mode. By disabling GPS positioning, the drone will not fight the wind to stay in one spot. This allows for smoother, constant-velocity slides that are otherwise impossible when the flight controller is making aggressive micro-corrections. This mode is particularly useful when flying near structures or under tree canopies where GPS signals are unreliable.
The parallax effect is another essential tool. You achieve this by flying the drone laterally while simultaneously yawing the gimbal in the opposite direction. This creates a sense of depth as the background moves at a different speed than the subject. For a more dramatic effect, the "Dolly Zoom" involves flying forward or backward while inversely adjusting the camera's zoom. This warps the background while keeping the subject the same size in the frame, creating a sense of unease or realization.
How to Execute a Professional Orbit Manoeuvre
A smooth 360-degree circle is a staple of professional aerial work. To execute this manually, follow these steps:
- Step 1: Centre the subject in the thirds grid and lock your focus point.
- Step 2: Apply a consistent lateral roll while applying a counter-yaw to keep the subject centred.
- Step 3: Gradually adjust the altitude or pitch to add a vertical dimension to the shot.
- Step 4: Maintain a constant speed; any change in stick pressure will result in jerky gimbal corrections.
Practising these manoeuvres is essential for those preparing for Advanced Flight Reviews, where precision control is a primary evaluation metric. Using an ergonomic harness can significantly improve your stick precision during these long, sustained movements.
The Art of the Reveal and Tracking Shots
Reveal shots add narrative weight to a scene. A low-to-high reveal starts with the camera pointed down or obscured by a foreground object, then rises and tilts up to introduce a vast landscape. Tracking shots also require specific choices. Lead-in tracking builds anticipation by staying ahead of a subject, whereas chase shots create energy by following from behind. Combining three-axis movement, such as simultaneous roll, pitch, and yaw, creates a "fly-through" feel. These advanced drone photography techniques separate professional work from hobbyist footage, allowing you to tell a story through movement rather than just capturing a view.
Advanced Composition: Seeing the Ground from a New Perspective
Technical mastery of your aircraft is a prerequisite for professional work, but the artistic value of your imagery depends on your compositional choices. Moving beyond standard eye-level shots requires a shift in how you perceive the environment. By applying advanced drone photography techniques focused on geometry and perspective, you can transform a mundane landscape into a compelling visual narrative. This involves more than just finding a subject; it requires organizing the frame to direct the viewer's eye with intentionality.
Utilizing top-down (nadir) geometry is one of the most effective ways to find abstract patterns in nature. When the camera points directly at the ground, depth cues disappear, allowing shapes, textures, and colours to become the primary focus. Winding Canadian rivers, the grid-like patterns of prairie farmland, or the transition between a forest edge and a snow-covered field all provide high-impact visual interest. While the "Rule of Thirds" remains a reliable foundation, centred symmetry often works better for architectural subjects or isolated features in a vast environment. Breaking the rules is encouraged when the subject demands a sense of balance or monumental scale.
Negative space is another powerful tool in the Canadian pilot's arsenal. Our vast landscapes offer unique opportunities to place a small subject within a massive, empty frame. This technique emphasizes the isolation and scale of the environment, whether it's a lone hiker on a ridge or a single boat on a Great Lake. Leading lines and vanishing points, such as a straight highway stretching toward the horizon, further help to pull the viewer into the frame, creating a sense of distance and journey.
Pre-Flight Scouting with Google Earth and Maps
Professional shoots begin long before the drone leaves the ground. Digital scouting tools allow you to identify "hidden" geometric patterns from satellite imagery that aren't visible from the road. Using 3D terrain views helps you predict sun angles and shadow lengths for specific times of day. This level of preparation ensures you don't waste battery life searching for a composition while in the air. Instead, you can fly directly to your planned coordinates and execute the shot with precision.
Shadows as a Subject: The Golden Hour Advantage
In the flat terrain common in many parts of Canada, long shadows during the golden hour add essential depth and texture. These shadows act as secondary subjects, creating leading lines or repeating patterns that wouldn't exist under the midday sun. When you shoot "into the sun," you can achieve atmospheric flare or dramatic silhouettes. However, this requires careful exposure management. You must balance the bright sky against dark forest canopies to ensure you don't lose detail in the shadows. Implementing these advanced drone photography techniques allows you to capture the rugged beauty of the Canadian wilderness with professional-grade clarity.
The Pilot’s Edge: Ergonomics and Control Precision
Executing advanced drone photography techniques requires high-level manual control. However, many pilots overlook the physical constraints of long-duration missions. Finger precision is often the primary bottleneck for cinematic shots. When you're holding a heavy smart controller for hours, fatigue leads to micro-tremors. These small movements are magnified in your footage, especially during slow, sweeping pans or complex orbits. Professional results depend on your ability to maintain steady stick pressure over time. Stability isn't just about the gimbal; it starts with the pilot's posture and grip.
Managing smart controllers effectively involves more than just holding the device. You must consider weight distribution and screen visibility, especially in high-glare environments like snow-covered fields or near glass-fronted urban centres. A stable controller keeps the screen at a consistent angle, ensuring you can monitor telemetry and your histogram without constantly adjusting your grip. This physical stability is what gives a professional the edge during complex, multi-axis shots that require sustained focus and delicate input.
Organizing your centre of operations in the field increases efficiency. A structured setup reduces the time spent on battery swaps and lens changes, keeping you in the air during peak lighting. Use a landing pad to protect sensors from dust and debris, especially in rugged Canadian terrain. This methodical approach ensures you stay focused on the creative aspects of the flight rather than logistical hurdles.
Maximizing Precision with Fitek Gear Harnesses
A professional drone harness for smart controller use is a critical piece of equipment. It stabilizes your hands by offloading the controller's weight to your shoulders. This setup eliminates "thumb jitter," allowing you to execute the micro-movements necessary for advanced cinematography. A dedicated DJI smart controller harness is essential for long-duration commercial missions where ergonomics are paramount. It allows you to focus entirely on the sticks rather than the strain on your wrists, which is vital for maintaining professional standards.
Environmental Adaptation: Cold Weather and Wind
Operating in Canada presents unique environmental challenges. Maintaining battery temperature is vital for high-speed manoeuvres. Cold batteries experience voltage drops, which can limit your flight performance or lead to unexpected landings. Keep your spares in a warmed case until the moment of flight. Sensor care is also a priority. When moving from a warm vehicle to the cold air, avoid condensation by letting the gear acclimate slowly in its case. For wind compensation, use the drone's inertia to your advantage. Lean into the wind and use subtle stick inputs to maintain a steady frame during gusty conditions.
For pilots ready to enhance their control precision on every mission, explore our selection of ergonomic drone harnesses designed for professional use.
The Professional Standard: Compliance and Delivery
Achieving a high standard of imagery is only one part of being a professional pilot. You must also ensure your operations align with the legal requirements of the Canadian Aviation Regulations. Many advanced drone photography techniques, such as flying in urban centres or within controlled airspace, necessitate a Transport Canada drone certification. Without this credential, you cannot legally perform the complex manoeuvres required for high-tier commercial contracts. Professionalism in this industry is defined by the intersection of creative skill and regulatory discipline.
Safety checks should not be seen as a hurdle to creativity; they are a core part of your professional workflow. Integrating a site survey and equipment inspection into your routine prevents incidents and protects your expensive gear. This level of discipline is also a prerequisite for obtaining commercial imagery insurance. Most insurers will only provide coverage if the pilot holds the appropriate certification and follows established safety protocols. Maintaining a professional flight log serves as proof of your recency and credibility, which is essential for building long-term client trust and meeting Transport Canada requirements.
The Path to Advanced Certification
Moving from basic flight to complex missions requires a structured approach to training. Mastering advanced drone photography techniques prepares you for the practical requirements of what is a drone flight review Canada. This review evaluates your ability to manage an aircraft safely in challenging conditions. Holding an Advanced Operations certificate allows you to operate in urban environments, opening up lucrative opportunities for real estate and infrastructure photography that are off-limits to basic certificate holders. It's the primary way to differentiate your services in a crowded market.
Post-Processing for Professional Results
The final step in delivering value is a refined post-processing workflow. Colour grading allows you to bring out the natural vibrance of Canadian landscapes, from the deep greens of the Boreal forest to the stark whites of winter peaks. Professional delivery also requires you to correct lens distortion and horizon tilt, ensuring your images look technically perfect. Finally, you must organize your files logically and export them for the intended medium. A high-resolution print requires different sharpening and compression settings than a file intended for social media. By mastering the full lifecycle of a shoot, from flight to final export, you realize the transition from a hobbyist to a master practitioner.
Transitioning to a Professional Aerial Standard
Transitioning from capturing simple snapshots to producing professional-grade masterpieces requires a commitment to technical precision and regulatory compliance. You've learned that mastering advanced drone photography techniques involves more than just owning a high-end sensor; it's about the deliberate control of light through manual settings and the physical stability provided by ergonomic gear. By integrating these practices with a disciplined safety workflow, you ensure your work meets the highest industry standards.
Whether you're managing exposure in high-contrast Canadian landscapes or executing complex multi-axis manoeuvres, the right preparation is essential. Our team supports your growth through expert-led online and in-person training, alongside specialized Fitek Gear retail options. We provide the tools and certifications necessary to turn your technical skills into a viable commercial service. Our certified Transport Canada flight reviewers are here to guide you through the final stages of your professional qualification.
Take the final step in your professional journey and book your Transport Canada Advanced Flight Review today. The sky offers limitless creative potential for those who fly with discipline and precision.
Frequently Asked Questions
What is the most important advanced drone photography setting for beginners?
Shooting in RAW is the most critical setting for those moving beyond basic automation. RAW files preserve the maximum amount of sensor data, allowing you to recover highlight and shadow detail during post-production. This is especially vital in Canadian landscapes where bright snow and dark forests create high-contrast scenes. Combining RAW with manual white balance prevents colour shifts, ensuring your advanced drone photography techniques result in a consistent, professional-grade portfolio.
Do I really need a special harness for my drone controller?
While not mandatory for casual flight, an ergonomic harness is essential for professional precision. We retail Fitek Gear harnesses because they offload the weight of smart controllers from your wrists to your shoulders. This eliminates "thumb jitter" during slow, cinematic pans and reduces fatigue during long commercial missions. Stabilizing your hands allows for the micro-movements required for high-end cinematography, giving you a significant edge in control and comfort.
How do I get smooth cinematic shots in windy conditions?
Achieving smooth shots in gusty Canadian conditions requires manual compensation and the use of Neutral Density (ND) filters. You should use the aircraft's inertia to your advantage by leaning into the wind with steady stick pressure. Switching to a manual flight mode can prevent the flight controller from making jerky GPS-based corrections. Additionally, using ND filters allows for a slower shutter speed, which introduces a natural motion blur that masks micro-vibrations caused by wind.
Can I fly my drone in Canadian national parks for photography?
Flying a drone in Canadian national parks is strictly prohibited for recreational purposes. Commercial pilots must obtain a Restricted Activity Permit from Parks Canada, which is rarely granted unless the project provides a direct benefit to park management or education. You must also hold a valid Transport Canada pilot certificate. Operating without these permits can lead to significant fines and the seizure of your equipment. Always verify local bylaws before planning a shoot.
What is the difference between a Basic and Advanced drone certificate in Canada?
The primary difference lies in where you can fly and your proximity to bystanders. A Basic certificate limits you to uncontrolled airspace and requires you to stay 30 metres away from people. An Advanced certificate allows you to fly in controlled airspace and within 5 metres of bystanders, provided you use a safety-assured drone. Obtaining an Advanced certificate through our training programs is necessary for most urban photography and professional commercial contracts in Canada.
How do I avoid grainy images when shooting at night with a drone?
To avoid grain or "noise" in low-light environments, you must keep your ISO as low as possible, ideally at the base level of 100. Professional pilots use long exposure settings and stable hovering to gather more light without increasing sensor sensitivity. If your drone has a 1-inch or larger sensor, you'll have better high-ISO performance. Using advanced drone photography techniques like tripod mode ensures the aircraft remains perfectly still during these longer shutter durations.
What are the best apps for planning professional drone shoots in Canada?
Professional planning in Canada requires a combination of airspace and weather tools. The NAV Drone app from NAV Canada is the authoritative source for checking airspace restrictions and requesting flight authorizations. UAV Forecast provides specific data on wind speeds at different altitudes and satellite visibility. For compositional planning, Google Earth Pro allows you to visualize terrain in 3D and predict shadow lengths, ensuring you arrive at your site with a clear execution plan.
How often do I need to perform a flight review to keep my advanced certificate?
You don't need to perform a new flight review every year, but you must meet Transport Canada recency requirements every 24 months. This can be achieved by completing a flight review, attending a safety seminar, or re-taking the online exam. Keeping a detailed flight log is the best way to prove your recency to authorities or clients. We provide professional flight reviews for those seeking their initial Advanced certificate or looking to refresh their skills.
Leave a comment