

Advanced Drone Photography: Professional 2026 Guide
Owning a high-end DJI Mavic 4 Pro doesn't make you a professional photographer any more than owning a scalpel makes you a surgeon. Many pilots realize that even with expensive equipment, images often come out flat or grainy when faced with the harsh highlights of a Canadian summer or the deep shadows of the Shield. You've likely felt the frustration of jerky gimbal movements ruining a cinematic sequence just as the light was hitting the horizon perfectly.
Mastering advanced drone photography techniques is the essential step to bridge the gap between hobbyist snapshots and the technical precision required for commercial deliverables. This guide provides the framework to achieve crisp, high-dynamic-range images and execute the fluid, intentional flight paths that define professional work. We will examine specific manual camera settings, ergonomic hardware control methods, and the methodical workflow standards necessary to align your operations with 2026 Transport Canada professional requirements. This structured approach ensures every flight results in usable, high-quality data that meets the rigorous demands of the modern industry.
Key Takeaways
- Transition from automatic snapshots to manual control by utilizing RAW formats and the 180-degree rule for cinematic motion.
- Master advanced drone photography techniques such as the parallax effect and precision orbits to create dynamic, high-fidelity visual narratives.
- Utilize top-down geometry and leading lines to find abstract patterns and professional perspectives in natural landscapes.
- Enhance flight precision and manage pilot fatigue during demanding sessions through the use of ergonomic controller harnesses.
- Align your technical skills with regulatory requirements to maintain a professional standard that satisfies Transport Canada certification and safety protocols.
Mastering Manual Camera Settings for High-Fidelity Aerials
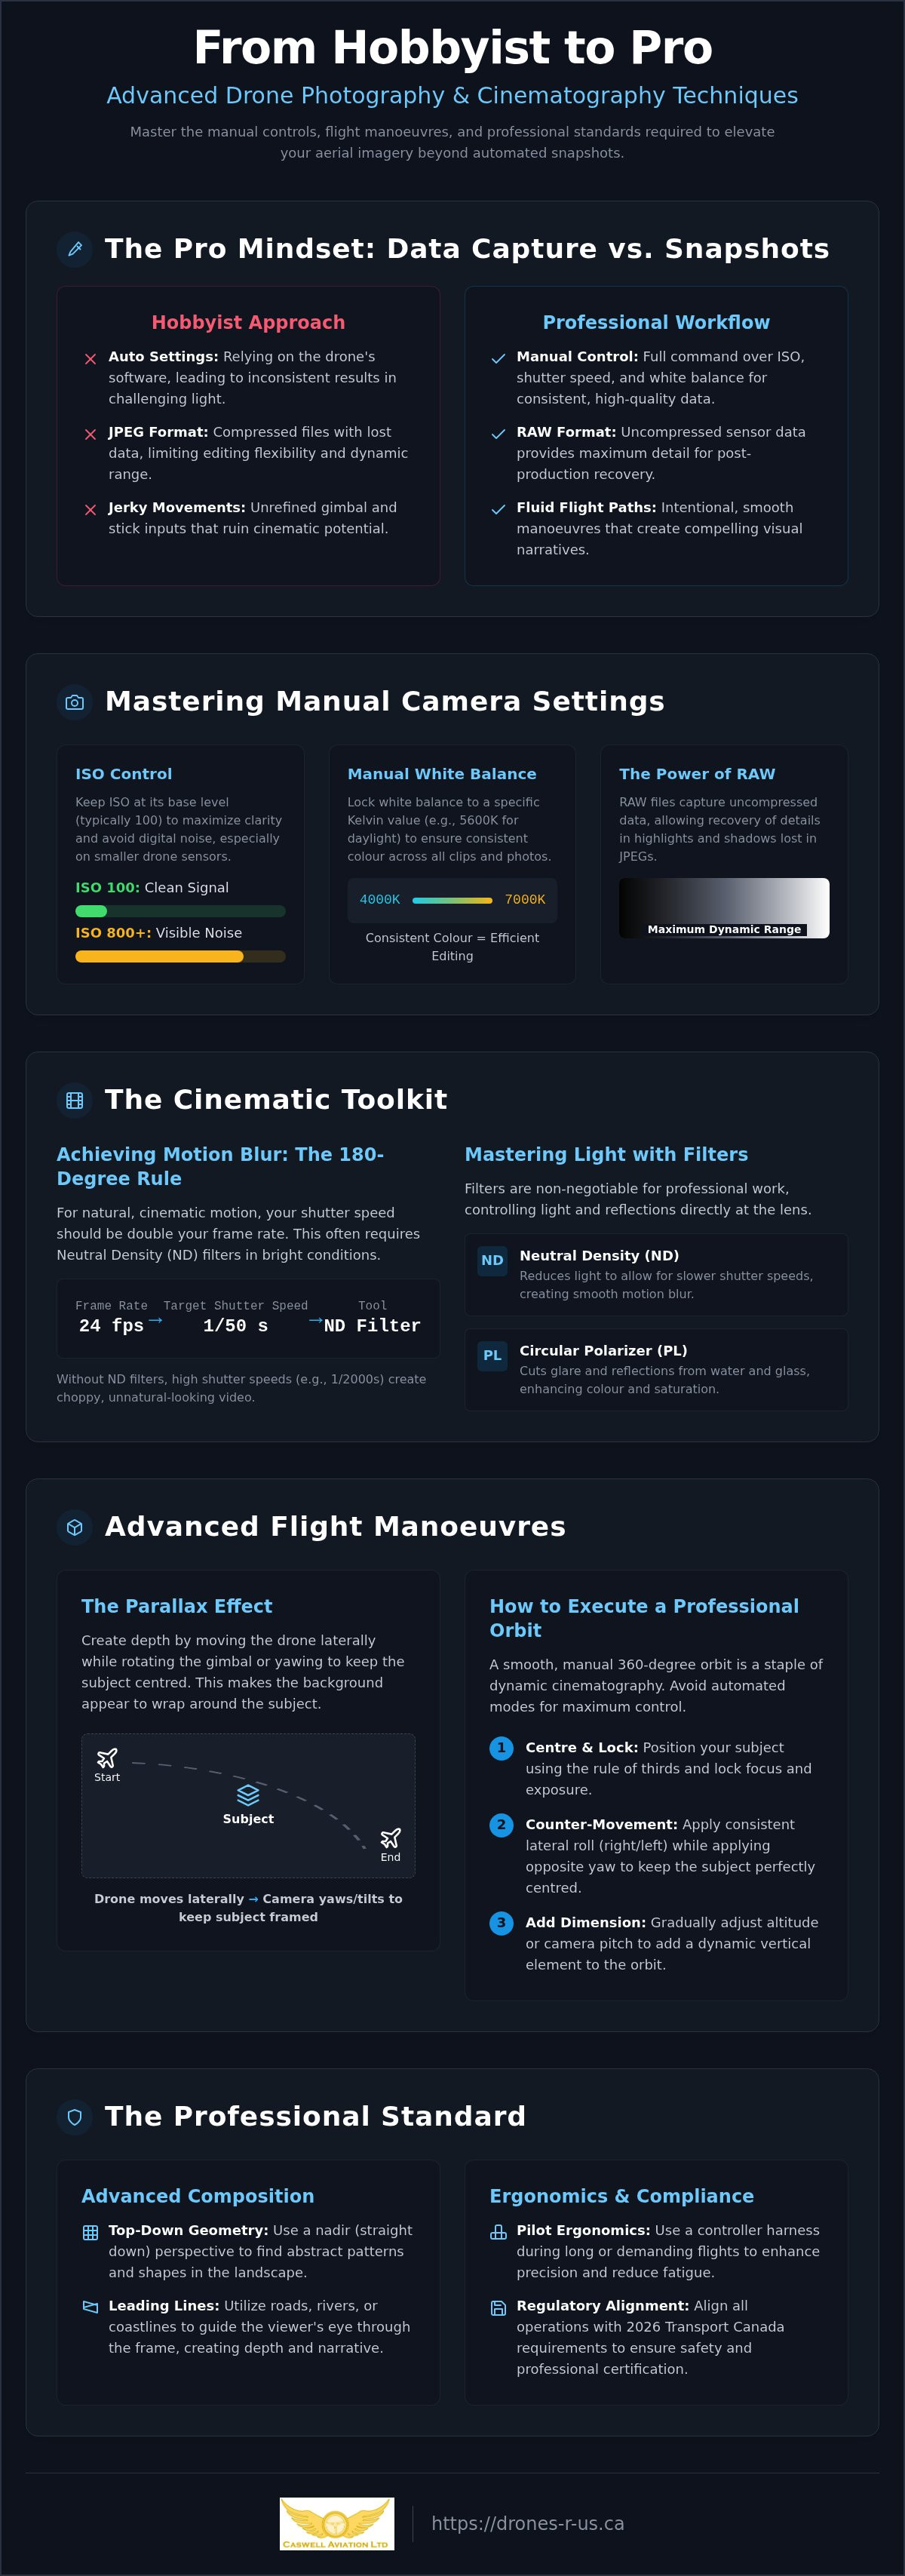
Professional aerial imagery begins with a shift in mindset from simply taking a picture to methodically capturing data. To execute advanced drone photography techniques effectively, you must understand the limitations of your hardware and the variables of the environment. Most professional drones in 2026, such as the DJI Mavic 4 Pro or Air 3S, utilize 1-inch or 4/3-inch sensors. While these sensors are highly capable, they possess a lower threshold for digital noise compared to full-frame ground cameras. Keeping your ISO at the base level, typically 100, is essential to maintain a clean signal-to-noise ratio and maximize image clarity.
Shooting in RAW is a requirement for any professional deliverable. RAW files contain the uncompressed data directly from the sensor, allowing you to recover details in the highlights and shadows that would otherwise be lost in a JPEG. This is particularly vital in high-contrast environments, such as a snowy peak against a dark evergreen forest. Instead of relying on the visual preview on your controller, you should always monitor the histogram. This graphical representation of light allows you to expose to the right without clipping your highlights, ensuring maximum data retention for the post-production phase.
The Power of RAW and Manual White Balance
RAW files provide the latitude needed to manage the complex dynamic range of the Canadian landscape. However, your workflow is more efficient when the initial capture is consistent. Using Auto White Balance is a common mistake. As the sun dips during a golden hour shoot, the drone's software will constantly shift the colour temperature to compensate, making it difficult to match clips later. You should lock your white balance to a specific Kelvin value, such as 5600K for daylight. This ensures that every image or video clip across multiple battery swaps maintains a uniform colour profile, saving hours in the editing suite.
Leveraging ND Filters for Motion Blur
Achieving a cinematic look requires adhering to the 180-degree rule. This means your shutter speed should be double your frame rate. In the bright Canadian sun, your shutter speed will naturally climb to 1/2000 or higher, resulting in choppy, amateur-looking motion. Neutral Density (ND) filters act as sunglasses for your lens. To realize advanced drone photography techniques in video, you will often need an ND16 or ND32 filter to bring your shutter speed down to 1/50 or 1/60 for a standard 24fps or 30fps project.
Circular Polarizing (PL) filters are equally critical when shooting near large bodies of water or glass-heavy urban centres. These filters cut through glare and reflections, revealing the true colour of a lake or the interior of a building. For still photography, combining a heavy ND filter with long-exposure settings allows you to turn moving water into a smooth, ethereal mist. This technique transforms a standard landscape into a high-end portfolio piece with professional polish.
Advanced Flight Manoeuvres for Dynamic Cinematography
While modern flight controllers offer automated "QuickShot" modes, these often lack the nuanced control required for high-end production. Mastering advanced drone photography techniques requires the ability to fly manually, allowing for organic adjustments that automated software cannot replicate. Manual flight provides a level of intentionality that separates standard footage from professional cinematography. It demands a disciplined approach to stick inputs to ensure every movement is fluid and purposeful. To see how these principles translate into high-end commercial cinematography, you can learn more about Mike Sobola and his professional aerial services.
The parallax effect is one of the most powerful tools in a pilot's repertoire. This manoeuvre involves moving the drone laterally while simultaneously rotating the gimbal or yawing the aircraft in the opposite direction. The result is a subject that remains stationary in the frame while the background appears to wrap around it. For those preparing for advanced flight reviews, demonstrating this level of multi-axis control is a hallmark of a professional operator. It shows a mastery of the aircraft that goes beyond basic navigation.
How to Execute a Professional Orbit Manoeuvre
A smooth 360-degree orbit is a staple of dynamic cinematography. To execute this manually, follow these steps:
- Step 1: Centre your subject using the rule of thirds grid and lock your focus and exposure settings.
- Step 2: Apply a consistent lateral roll (right or left) while providing a counter-yaw in the opposite direction to keep the subject centred.
- Step 3: Gradually adjust your altitude or pitch to add a vertical dimension, creating a spiralling effect.
- Step 4: Maintain a constant stick pressure. Jerky movements often trigger gimbal stabilization lag, which ruins the shot.
The Art of the Reveal and Tracking Shots
Reveal shots are essential for establishing a sense of scale in the Canadian landscape. A low-to-high reveal begins with the drone close to an obstacle or the ground, followed by a rapid ascent and gimbal tilt-up to showcase a vast horizon. This technique creates a dramatic transition that captures the viewer's attention immediately. It relies on the pilot's ability to coordinate throttle and gimbal pitch at the same time.
Tracking shots require a deep understanding of subject speed. Lead-in tracking, where the drone flies backward while the subject moves forward, creates a sense of anticipation. Conversely, chase shots from behind provide a feeling of momentum. Combining three-axis movement, such as a forward flight with a simultaneous descent and gimbal pan, provides the "fly-through" feel common in high-budget cinema. Achieving this level of precision often requires moving beyond GPS-assisted modes into ATTI mode, where the pilot has total control over the aircraft's inertia and positioning in complex environments.
Advanced Composition: Seeing the Ground from a New Perspective
Composition at altitude requires a fundamental shift in how you perceive the environment. While ground-level photography relies on eye-level perspective, advanced drone photography techniques leverage the unique geometry visible only from the air. You must look for patterns, leading lines, and vanishing points that are invisible to those on the ground. A winding river or a forest trail becomes a powerful compositional tool when viewed from above, directing the viewer’s eye through the frame with intentionality.
Utilizing the nadir, or top-down, perspective allows you to capture abstract patterns in nature. This orientation flattens the world into a two-dimensional canvas of textures and shapes. When shooting the Canadian Shield or the vast prairies, negative space becomes a critical asset. Large areas of snow or water can be used to emphasize the scale of a single subject, such as a lone cabin or a moving vehicle. While the Rule of Thirds remains a reliable standard, centred symmetry often provides a more impactful result for architectural or geometric subjects, creating a sense of balance and stability.
Pre-Flight Scouting with Google Earth and Maps
Professional results are rarely the product of chance. They are the result of meticulous preparation. Using Google Earth Pro allows you to identify hidden geometric patterns and potential flight paths before you even leave your office. The 3D terrain view is an essential tool for predicting how sun angles will interact with the landscape. By simulating the time of day, you can visualize shadow lengths and plan your shots to coincide with the best possible lighting. This level of preparation is a hallmark of advanced drone photography techniques, as it minimizes battery waste and ensures you are in the air only when conditions are optimal.
Shadows as a Subject: The Golden Hour Advantage
In the high-latitude Canadian landscape, the golden hour provides long, dramatic shadows that add essential depth to otherwise flat terrain. These shadows act as leading lines themselves, creating texture on surfaces like tilled farmland or fresh snow. Shooting into the sun allows you to capture atmospheric flare or create striking silhouettes, but it requires careful exposure management. You must balance the bright horizon against the dark, dense forest canopies typical of Northern Ontario or British Columbia. This contrast is where your technical mastery of the histogram meets your creative intuition, resulting in a professional-grade image that conveys both scale and emotion.
The Pilot’s Edge: Ergonomics and Control Precision
The physical interface between the pilot and the controller is often the most overlooked aspect of high-end aerial production. While we have discussed the technicalities of advanced drone photography techniques, the actual execution of these shots relies entirely on fine motor skills. Finger precision is frequently the primary bottleneck for cinematic work. When a pilot is forced to support the weight of a heavy smart controller while simultaneously attempting microscopic stick movements, muscle fatigue sets in quickly. This fatigue leads to "thumb jitter," which translates into visible micro-stutters in your footage that even the best gimbal cannot fully rectify.
Organizing your centre of operations in the field is essential for maintaining this precision. A professional setup involves more than just unfolding the drone. It requires a methodical approach to weight distribution and screen visibility. Smart controllers in 2026 feature high-nit displays that are easy to see in direct sunlight, but their increased battery capacity makes them significantly heavier than standard remotes. Managing this weight is not just a matter of comfort; it is a prerequisite for the steady, intentional flight paths required for commercial-grade deliverables.
To browse the latest smart controllers and high-performance accessories, you can discover Fishinitis Inc for a variety of specialized technology products.
Maximizing Precision with Fitek Gear Harnesses
Utilizing a drone harness for smart controller is a standard practice for veteran practitioners. By offloading the weight of the device to your shoulders and core, you free your hands to focus entirely on control inputs. This stabilization is critical for executing the complex, multi-axis manoeuvres described in earlier sections. A dedicated DJI smart controller harness ensures the screen remains at a consistent angle and distance from your eyes, reducing neck strain during long-duration commercial missions. This ergonomic advantage allows you to maintain a high level of performance from the first battery to the last.
Environmental Adaptation: Cold Weather and Wind
Operating in the Canadian climate introduces unique physical challenges that affect control precision. Cold weather reduces battery voltage, which can lead to sluggish response times during high-speed manoeuvres. It's vital to keep your flight batteries in a warmed case until the moment of takeoff. Furthermore, moving your gear from a warm vehicle into the crisp outdoor air can cause sensor condensation. Allow your equipment to acclimate to the ambient temperature to prevent lens fogging or internal moisture issues.
Wind compensation is another area where ergonomic support proves its value. In gusty conditions, you must provide constant, minute counter-inputs to maintain a steady frame. This requires a level of stamina that is difficult to sustain without proper support gear. To optimize your field performance and ensure your equipment is ready for these challenges, you can browse our professional range of drone accessories and training resources. Maintaining a culture of discipline in your physical setup is what ultimately allows your creative vision to reach the screen without technical compromise.
The Professional Standard: Compliance and Delivery
Professionalism in the drone industry is defined by the intersection of creative skill and regulatory discipline. While mastering advanced drone photography techniques provides the visual results clients demand, those results must be achieved within the legal framework established by the federal government. In Canada, operating a drone for commercial purposes or in complex environments requires a valid Transport Canada drone certification. This document is more than a legal prerequisite; it is a signifier to clients and insurers that you possess the technical knowledge to manage risks in controlled airspace or near bystanders.
Integrating rigorous safety checks into your creative workflow prevents incidents that could jeopardize your career. A professional pilot treats the pre-flight inspection with the same level of detail as the camera settings. This includes verifying site-specific weather, checking for firmware updates, and ensuring the structural integrity of the aircraft. Maintaining a comprehensive flight log provides a record of your experience and recency. This documentation is essential for both regulatory compliance and for securing commercial liability insurance, which often requires proof of certification for high-value projects.
The Path to Advanced Certification
Mastering the manual manoeuvres and ergonomic controls discussed earlier prepares you for the practical assessment of your skills. If you intend to fly in urban centres or within 30 metres of people, you must understand what is a drone flight review Canada. This in-person evaluation tests your ability to handle the aircraft safely while managing the cognitive load of a mission. Obtaining an Advanced Operations certificate allows you to access lucrative urban photography markets that are off-limits to basic-level pilots. It also ensures you stay current with the 24-month recency requirements mandated by Transport Canada for all certified operators.
Post-Processing for Professional Results
The final stage of advanced drone photography techniques occurs in the editing suite. RAW files captured from 1-inch or 4/3 sensors require specific colour grading to bring out the natural vibrance of Canadian landscapes, particularly the deep greens of the boreal forest or the subtle blues in winter shadows. You must correct for lens distortion and ensure the horizon is perfectly level; a tilted horizon is a common marker of amateur work. When delivering files, organize them into logical folders based on the intended medium. High-resolution TIFF or JPEG files are necessary for high-quality print, while specific crops and bitrates are required for social media platforms. Providing a structured delivery package demonstrates a level of service that matches the quality of your aerial imagery.
Solidifying Your Professional Aerial Standard
Achieving professional results requires more than just high-end hardware; it demands a commitment to technical discipline and physical precision. By mastering advanced drone photography techniques, such as manual exposure management and multi-axis manual flight, you separate your work from standard hobbyist output. We've established that ergonomic support from Fitek gear is essential for the micro-movements required in high-fidelity cinematography. Finally, ensuring your operations meet Transport Canada standards protects your professional reputation and commercial viability.
As specialized Fitek Gear retailers and providers of expert-led online and in-person training, we're here to support your transition to the commercial sector. Our certified Transport Canada Flight Reviewers provide the final validation of your skills and operational safety. Book your Transport Canada Advanced Flight Review today to formalize your expertise and expand your operational capabilities. The landscape of aerial imagery is constantly evolving, and your skill set should do the same.
Frequently Asked Questions
What is the most important advanced drone photography setting for beginners?
Manual camera mode is the most critical setting to master when moving beyond basic snapshots. It allows you to lock your ISO, shutter speed, and aperture to ensure visual consistency throughout a flight. This control is the foundation for all advanced drone photography techniques, as it prevents the aircraft's software from making erratic exposure changes that can ruin a professional sequence.
Do I really need a special harness for my drone controller?
A professional harness is necessary for any pilot performing long-duration commercial missions or complex manoeuvres. By offloading the weight of a smart controller to your shoulders, you eliminate the physical strain that causes hand tremors. This ergonomic support allows for the microscopic stick inputs required for high-fidelity cinematography and reduces fatigue during demanding workdays in the field.
How do I get smooth cinematic shots in windy conditions?
Increasing your drone's speed and using manual flight inputs to counter the wind's direction will help stabilize your footage. Flying in Sport mode or ATTI mode provides the aircraft with more power to fight gusts, while a heavier drone naturally handles turbulence better than ultra-light models. You must also ensure your gimbal is set to "Follow" mode to keep the horizon level during banked turns.
Can I fly my drone in Canadian national parks for photography?
Recreational drone flight is prohibited in all Canadian national parks to protect wildlife and visitor privacy. Commercial operators may apply for a Restricted Activity Permit through Parks Canada, but these are typically granted only for projects that benefit park management or conservation efforts. Unauthorized flights in these areas can result in significant fines and the seizure of your equipment.
What is the difference between a Basic and Advanced drone certificate in Canada?
The primary difference involves the type of airspace you can access and your proximity to bystanders. A Basic certificate allows for flight in uncontrolled airspace at least 30 metres away from people. An Advanced certificate permits operations in controlled airspace and within 30 metres of bystanders, provided you use a drone with a manufacturer safety declaration and pass a flight review.
How do I avoid grainy images when shooting at night with a drone?
Keep your ISO at its base level, typically 100, and use a slower shutter speed to gather more light. Since drones are subject to wind drift, you should utilize high-precision hovering modes to keep the aircraft stable during long exposures. Utilizing post-processing software with modern noise reduction algorithms can also help clean up digital artifacts without sacrificing the sharp details of your subject.
What are the best apps for planning professional drone shoots in Canada?
NAV Canada's NAV Drone app is the essential tool for checking airspace restrictions and requesting flight authorizations in real time. For environmental planning, UAV Forecast provides wind speeds at specific altitudes, while PhotoPills is excellent for tracking sun positions to time your golden hour shots. Using these tools is a standard part of executing advanced drone photography techniques with professional precision.
How often do I need to perform a flight review to keep my advanced certificate?
You do not need to retake a flight review to keep your certificate, but you must satisfy Transport Canada recency requirements every 24 months. This can be achieved by completing a self-study course, attending an industry seminar, or completing a new flight review. Most professional pilots choose a flight review or structured training to stay updated on the latest regulatory changes and safety protocols.
Leave a comment