

Aerial HDR Bracketing: A Practical Drone Guide
The best exposure in a drone sequence may not be the one that holds the whole scene. A bright sky and dark ground can exceed what a single frame captures well, while wind or aircraft movement can make multiple exposures difficult to align. Bracketing for aerial HDR photography helps manage that contrast, but the capture needs to be planned for a moving platform.
If you’ve wondered how many frames to take, how far apart to expose them, or why a merged image looks blurred or overprocessed, those are practical concerns. Auto Exposure Bracketing (AEB) captures a set of photos at different exposures; HDR is the result of merging them later. Natural-looking results start with choosing the right scene and keeping the sequence as consistent as possible.
This guide explains when exposure bracketing is useful, how to set up a usable aerial sequence, and how to merge exposures while preserving realistic colour and detail. You’ll also learn how to reduce common problems caused by drone movement and changing light, so your aerial images look balanced rather than artificial.
Key Takeaways
- Use a single exposure when the scene’s contrast is manageable or movement makes multiple frames harder to align.
- For bracketing for aerial HDR photography, choose the frame count and exposure spacing according to scene contrast and your camera’s capabilities.
- Keep the composition consistent during capture, then review the sequence for changes in framing or light before merging.
- During editing, check for alignment issues and ghosting, where moving objects appear doubled or blurred, and keep the final tones natural.
- Match your exposure approach to the subject and intended use, especially when preparing professional aerial imagery.
When Does Bracketing Improve Aerial HDR Photography?
Aerial scenes often place very bright and very dark areas in the same frame. A drone looking across a lake toward a sunlit horizon, for example, may record a bright sky while the shoreline and trees below fall into deep shadow. If one exposure can’t retain useful detail in both, capturing several exposures gives you more information to work with.
Exposure bracketing means photographing the same composition at different exposure values. The general exposure bracketing technique creates a set of frames, each recording a different tonal range. HDR, or high dynamic range, is the result of combining selected frames so the final image can retain detail in bright highlights and darker areas.
Bracketing is optional, not a requirement for every aerial photo. Use one exposure when it preserves the detail you need in the important parts of the scene. A bracket adds capture and editing steps, and changes in position or subject between frames can complicate the merge. The decision comes down to whether the scene’s contrast exceeds what one well-exposed frame can handle, and whether the scene is stable enough for a consistent set.
What exposure bracketing adds to an aerial image
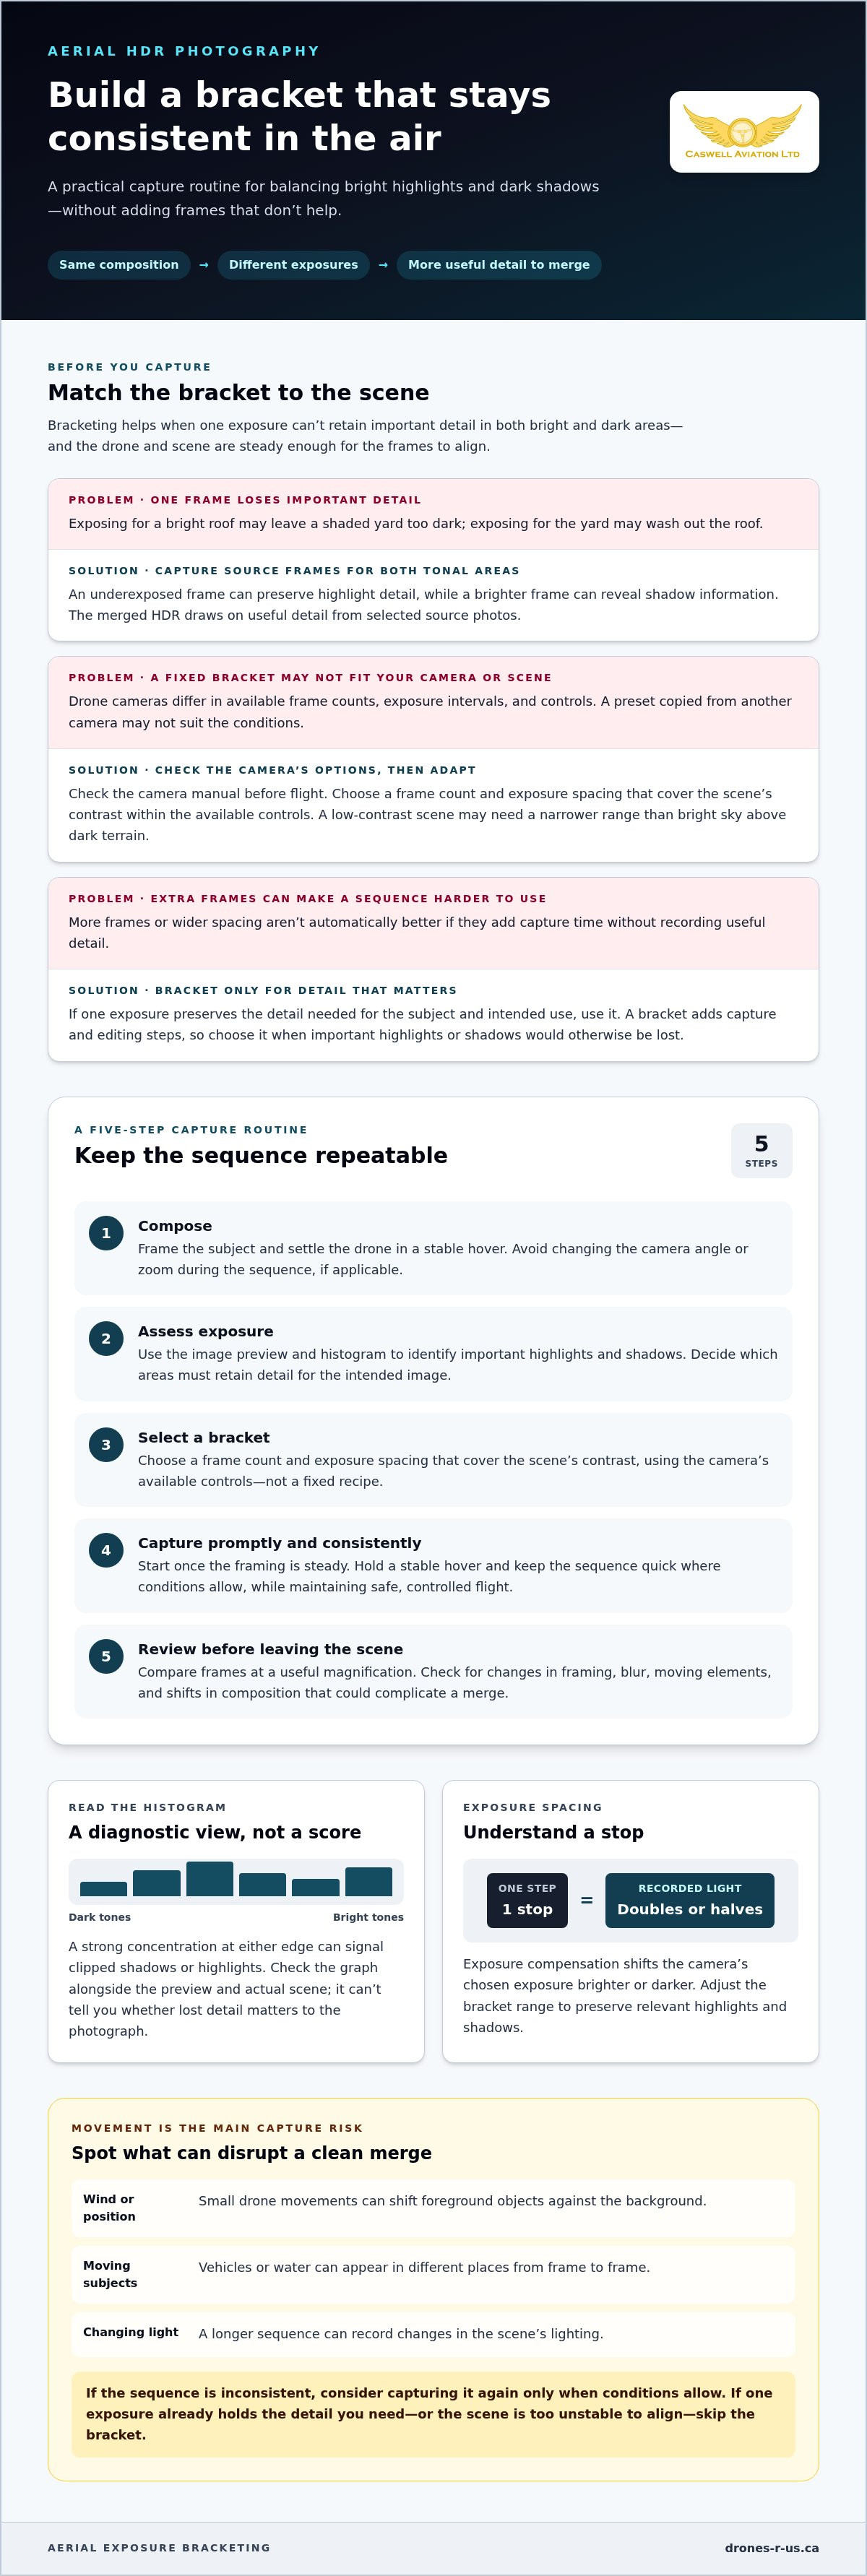
An underexposed frame can preserve highlight detail, such as texture in bright clouds or a pale sky. A brighter frame can reveal information in shadowed areas, such as trees or buildings beneath the drone. These are source photos, not finished HDR images. The merged result draws on useful detail from those frames, while each source retains its own exposure and tonal balance.
Consider a property photographed from above with a bright roof and a shaded yard. If exposing for the yard washes out the roof, while exposing for the roof leaves the yard too dark, a bracket may provide a better set of source details. For property visual specialists like Framework Creative, achieving this balance ensures architectural features and landscaping both stand out cleanly. But if the yard is not important to the final image, or one exposure already shows enough detail, extra frames may not improve the result.
How the histogram helps identify high-contrast scenes
A histogram shows how tones are distributed from dark to bright. It’s a diagnostic view, not a quality score. A strong concentration at either edge can signal clipped shadows or highlights, where detail may be lost. Check the histogram alongside the image preview and the actual scene, since a graph alone can’t tell you whether the lost detail matters to your photograph.
Before bracketing, ask three questions:
- Does one exposure preserve important detail in both the brightest and darkest areas?
- Would missing detail affect the subject or intended use of the image?
- Are the drone and scene steady enough for the frames to align well?
If one exposure holds the detail you need, use it. If important highlights or shadows are lost and the scene is stable, bracketing for aerial HDR photography can provide more latitude when you create the final image.
How to Set Up Exposure Bracketing for a Drone
A dependable bracket starts with a repeatable capture routine, not a preset copied from another camera. Drone cameras differ in their available frame counts, exposure intervals and controls. Check your camera manual for its bracketing options and limits before flight, then adapt the sequence to the scene. This keeps bracketing for aerial HDR photography practical without assuming every aircraft handles exposure the same way.
- Compose: Frame the subject and settle the drone in a stable hover. Avoid changing the camera angle or zoom during the sequence, if applicable.
- Assess exposure: Use the image preview and histogram to identify important highlights and shadows. Decide which areas must retain detail for the intended image.
- Select a bracket: Choose a frame count and exposure spacing that cover the scene’s contrast, within the camera’s available controls. A low-contrast scene may need a narrower range than a view with bright sky and dark terrain.
- Capture: Start the bracket sequence once the framing is steady. Keep the capture quick and consistent where conditions allow.
- Review: Check the sequence at a useful magnification. Look for changes in framing, blur or moving elements that could complicate a merge.
Choose a base exposure and bracket range
Begin with a balanced base exposure, then inspect the areas that matter most. Exposure compensation shifts the camera’s chosen exposure brighter or darker; a stop represents a step in exposure, with each step doubling or halving the light recorded. The camera’s bracket controls determine how that shift is applied across frames. Adjust the range to preserve relevant highlights and shadows instead of following a fixed recipe. More frames or wider spacing aren’t automatically better if they add capture time without useful detail.
Reduce movement between bracketed frames
Wind can move the drone, and small changes in position can shift foreground objects against the background. Moving subjects, such as vehicles or water, can also appear in different places from frame to frame. Changing light may alter the scene during a longer sequence. Hold a steady hover and capture promptly when conditions permit, while maintaining safe, controlled flight. Before leaving the scene, compare frames for movement, blur and shifts in composition. If the sequence is inconsistent, consider capturing it again only when conditions allow.
These checks help you judge whether a sequence is suitable for editing, rather than discovering alignment problems at your computer. For a commissioned aerial image, professional drone photography and video can be tailored to the project’s subject and intended use.
Single Exposure or Aerial HDR Bracketing: Which Should You Use?
The right choice depends on the scene and the final image you need, not on a rule to bracket every flight. A single exposure is simpler and avoids alignment issues between frames. Bracketing gives you extra tonal information to work with, but it also adds capture and editing steps. The HDR merge is a later editing choice, not another way to capture the scene.
| Approach | Tonal detail | Capture complexity | Alignment risk | Editing effort |
|---|---|---|---|---|
| Single exposure | Limited to the useful detail recorded in one frame | Low | None between bracket frames | Usually lower |
| Bracketed capture | Several exposures provide more tonal options | Higher, as the sequence must be captured consistently | Present if the drone, scene or framing shifts | Frames need review and selection |
| HDR merge | Combines selected exposures to retain detail across tones | Doesn’t add capture steps, but requires source frames | Depends on consistency of the bracketed frames | Includes merging and natural-looking tonal adjustments |
When one exposure is the better choice
Choose one exposure for evenly lit scenes where important highlights and shadows remain controlled in the same frame. It’s also sensible when the subject is moving, the light is changing quickly, or drone movement could make several frames difficult to align. Use the simplest method that preserves the image’s intended detail. Extra frames won’t help if one exposure already does the job.
When bracketing is worth the extra frames
Bracketing can help with a backlit building, a bright sky above a shaded landscape, or deep foreground shadows beneath sunlit terrain. In these scenes, one exposure may lose detail in areas that matter. A bracket offers more tonal choices, not an automatic improvement. The source frames still need to be sharp and consistent enough for a clean merge.
Use this quick decision check before choosing:
- Stay with one frame if it preserves detail in the subject and other important areas.
- Bracket the scene if important highlights and shadows exceed one exposure’s useful range, and conditions allow a consistent sequence.
- Skip the merge if movement or changing light makes the source frames noticeably different.
For example, a backlit building might need a bracket to retain detail on both its shaded façade and the bright sky behind it. If the building or surrounding scene changes between exposures, however, the merged image may show misaligned edges or ghosting. In that case, a carefully chosen single frame can be the more reliable result. The aim of bracketing for aerial HDR photography is to preserve useful detail without adding complexity the scene doesn’t need.
How to Merge Bracketed Drone Photos into Natural HDR
A good merge depends on more than selecting an HDR command. First confirm that the source frames belong to the same composition and are consistent enough to combine. Then handle alignment and ghosting before making creative tonal or colour adjustments. Keeping those stages separate makes it easier to spot capture problems and avoid an artificial look.
Prepare and align the exposure set
Group the frames from one bracket together and confirm that the sequence is complete. Use compatible editing software with a merge function, following its current instructions. Alignment adjusts for slight shifts between frames; it can’t guarantee a clean correction if the drone or scene moved substantially. After merging, inspect fine edges and details closely for blur, doubled features or misalignment.
- Group the source frames: Separate each bracketed composition from other photos captured during the flight. Check that the frames show the same view and include the intended exposures.
- Choose the merge: In your editing software, select the complete set and use its HDR merge workflow. If alignment options are available, use them when the frames show small shifts. Automated alignment can help, but review the result rather than assuming every edge is corrected.
- Inspect for ghosting: Ghosting occurs when a moving object appears doubled, blurred or partly transparent because it changed position between exposures. Check areas such as tree branches, water, traffic and building edges. If the software offers ghost removal, treat it as a correction aid, not a guarantee.
- Review the merged file: Check the full composition, then zoom in on fine details. Look for soft edges, seams or tonal patches that weren’t apparent at fit-to-screen size.
Correct HDR artefacts without over-processing
Finish the merge before making broader tonal and colour changes. Check for bright halos along buildings, noisy shadows and highlights that still appear clipped. If the image feels artificial, reduce excessive saturation or local contrast rather than adding more sharpening or contrast. Compare the edit with the original frames as a reference for believable light and colour.
Keep the goal simple: recover useful detail while retaining natural separation between bright and dark areas. Aerial surfaces can look flat if shadows are lifted too far, while aggressive contrast can create harsh edges and halos. Make adjustments gradually, then review the image at both a full-frame view and closer magnification. Bracketing for aerial HDR photography provides more tonal choices, but the final image should still reflect the scene rather than the processing.
For imagery where the subject, intended use and final presentation all need to work together, explore Caswell Aviation’s aerial photography and video services, tailored to project requirements.
Applying Bracketing to Professional Aerial Photography
A field checklist for consistent aerial image sets
Use a consistent process from planning through editing. Before flight, consider the subject, lighting and how the image will be used. In the air, keep the composition steady during any bracket. After capture, assess whether the frames are usable before relying on them for a finished image.
- Before capture: Confirm the intended subject and composition. Assess where the important highlights and shadows fall, and decide whether one exposure is likely to retain the detail the image needs.
- During capture: If you bracket, keep the framing consistent and capture the sequence in a stable hover when conditions allow. Choose the exposure range according to the scene and the camera’s available controls.
- Review on site: Check that the frames are sharp, show matching framing and contain useful tonal detail. Look for movement or changes in light that could make them difficult to merge.
- During editing: Keep the original exposures available while you review the merged image. Comparing them helps you judge whether the final tones and colours remain believable.
Technical choices should serve the image brief. They don’t determine where or how a drone may be operated; follow applicable flight planning and operating requirements independently of the photography workflow.
From exposure technique to commissioned aerial imagery
Bracketing captures additional exposure choices, but it doesn’t promise a specific HDR appearance. The final result depends on the source frames, the scene and the editing decisions. For professional work, the subject, intended use and lighting should guide whether a single exposure or a bracket best supports the deliverable.
Caswell Aviation Ltd provides aerial photography and video services tailored to client requirements. The Photography / Video Basic Package provides up to 30 unedited photos and up to 30 minutes of unedited video, with up to 1 hour on-site filming, for $250 + GST. The Photography / Video Advanced Package provides up to 30 edited photos and up to 10 minutes of edited video, with up to 1 hour on-site filming, for $500 + GST. These packages offer different deliverables; bracketing or HDR merging shouldn’t be assumed as part of either package.
If you need commissioned aerial imagery, explore Caswell Aviation’s aerial photography and video services and choose the package that fits your project.
Put Your Aerial Image Goals Into Practice
Your next step is to make exposure choices with the finished image in mind. Before a flight, consider what the photograph needs to communicate and which areas must retain useful detail. That purpose helps you decide whether to keep the capture simple or plan for more tonal options. With practice, bracketing for aerial HDR photography becomes a deliberate tool rather than an automatic setting.
If you’re planning imagery for a project, Caswell Aviation Ltd provides aerial photography and video services tailored to client requirements. The Photography / Video Basic Package provides unedited photos and video, while the Photography / Video Advanced Package provides edited photos and video. The right deliverable depends on what you need from the finished work.
Explore aerial photography and video services to find an option suited to your project. Let the image’s purpose guide each capture.
Frequently Asked Questions
What is bracketing in aerial HDR photography?
Bracketing is a capture method that records several versions of the same view at different exposures, often using a drone camera’s Auto Exposure Bracketing (AEB) control. You then select or merge those source files during editing. For example, a darker frame might retain cloud texture while a brighter one shows detail on a shaded roof. AEB describes the capture; HDR describes the edited result.
How many exposures should I use for drone HDR photography?
Use the smallest sequence that records the tonal range you need and that your camera supports. The right count depends on how far apart the important highlights and shadows are, not on a universal recipe. A scene with a moderately bright sky may need fewer source frames than a high-contrast view with bright clouds and a shaded subject. Check your camera’s manual for the available frame counts and exposure intervals.
When should I use exposure bracketing instead of one drone photo?
Bracket when one frame can’t retain important detail across the scene, such as a building façade in deep shade beneath a bright, cloud-filled sky. If the subject is evenly lit, or only one area matters to the final image, a single photo may be sufficient. Consider how the image will be viewed or used: detail in an unimportant background area may not justify extra captures and editing.
Can wind or drone movement ruin a bracketed HDR image?
Movement can make a bracket difficult to merge, especially when it shifts the view between exposures or blurs fine detail. A brief gust may move branches or change the drone’s position, leaving edges misaligned. Alignment tools can compensate for some small shifts, but they can’t restore detail lost to blur or reliably fix substantial movement. Review the sequence before relying on it as your only capture.
Do I need special software to merge bracketed drone photos?
You need editing software that can combine multiple exposures into an HDR image, but it doesn’t have to be a dedicated HDR application. Some photo editors include an HDR merge function alongside other editing tools. Confirm that your software supports the files from your camera, then follow its current merge workflow. You can still edit a single frame in ordinary photo software, but that isn’t the same as merging a bracket.
Why do my aerial HDR photos look unnatural?
An artificial appearance often comes from pushing shadows too bright, increasing saturation too far, or applying strong local contrast. These edits can flatten the sense of depth, make colours look exaggerated, or create bright outlines around rooftops and other edges. Reduce the adjustment that draws attention first, then compare the result with the original exposures. Aim for detail that reads clearly while the light still feels credible.
Should I shoot RAW for aerial HDR bracketing?
RAW can provide more room to adjust tones and colour during editing, which is useful when balancing aerial scenes with bright skies and shadowed subjects. It doesn’t recover detail that the sensor never recorded, correct movement, or remove the need for a suitable exposure range. Camera support for RAW and bracketed capture varies, so check the manual and keep the original files for comparison during editing.
Leave a comment