

Creating a 3D Model from Drone Photos: A Step-by-Step Guide
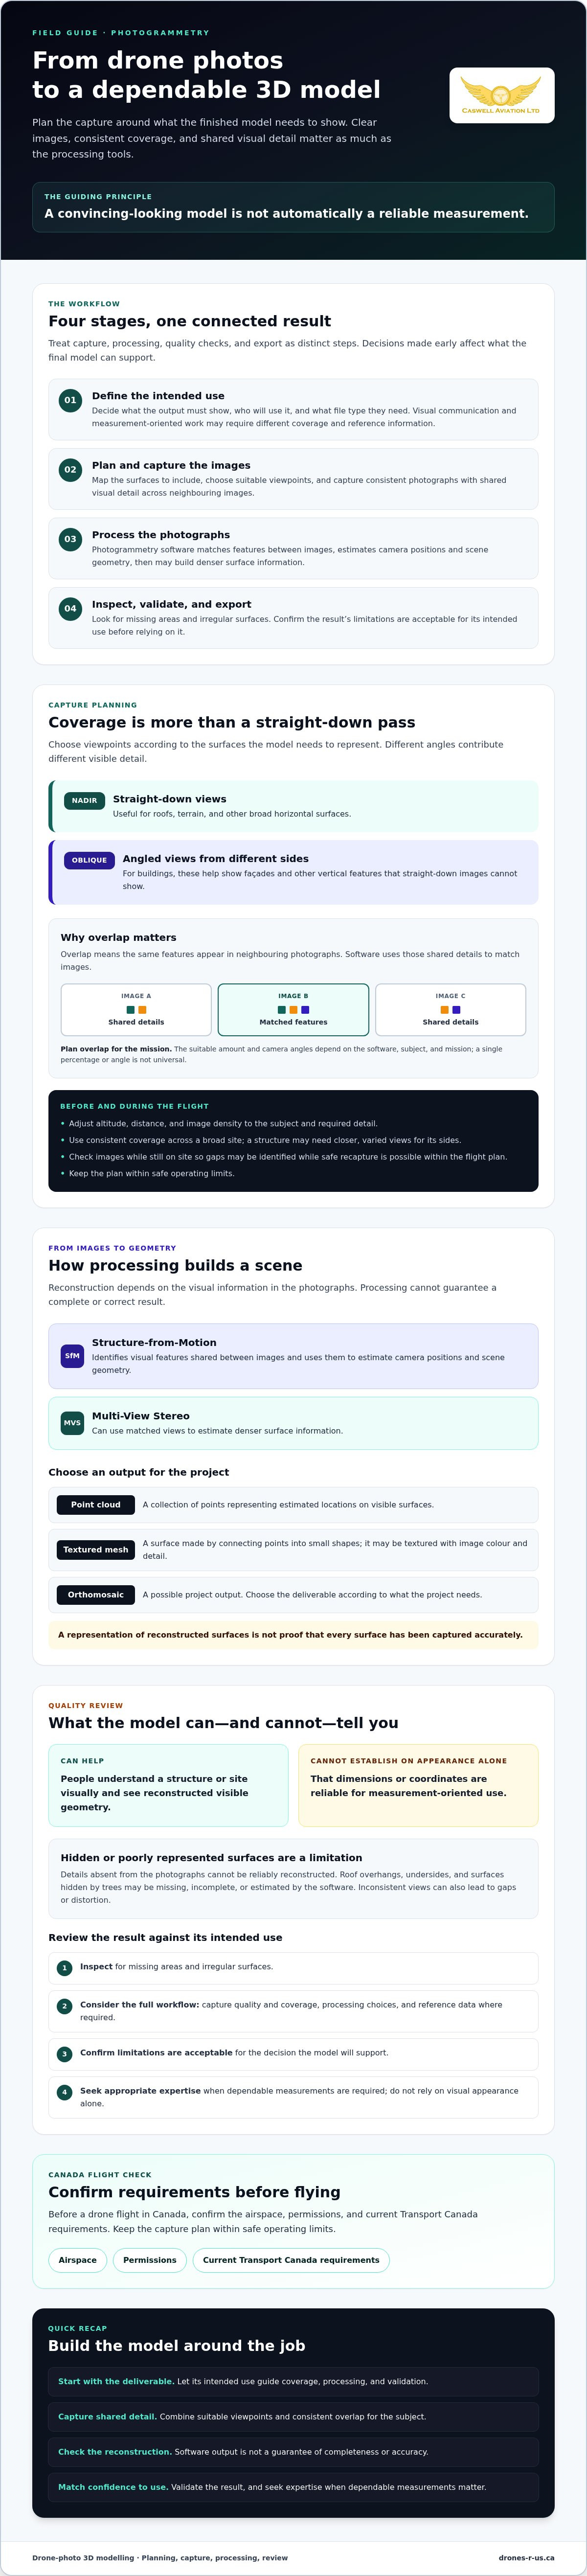
Better software can’t rescue a weak set of drone photos. When creating a 3D model from drone photos, consistent coverage, clear images, and suitable overlap matter as much as the processing tools you choose. If you’re unsure how to plan a flight, which angles to capture, or how to judge whether you have enough overlap, start by defining what the finished model needs to show.
A reliable model starts before takeoff. A clear capture plan gives photogrammetry software the visual information it needs to reconstruct the site and reduces the risk of gaps or distortion. You’ll also need to check whether the finished model is dependable enough for its intended use, especially if measurements matter.
This guide walks through the process step by step: planning a safe, consistent photo capture in Canada, choosing image angles and overlap, processing photographs into a 3D deliverable, and assessing the result. You’ll learn what to look for in a model and when its limitations mean you should seek expert support. The aim is to help you make informed choices at every stage, from flight planning to final review.
Key Takeaways
- Start with the model’s intended use so you can choose suitable image coverage and a useful final output.
- Understand how shared visual detail across photographs helps photogrammetry software match features and reconstruct a scene.
- When creating a 3D model from drone photos, treat image capture, processing, inspection, and export as distinct steps.
- Choose between a point cloud, textured mesh, or orthomosaic based on what the project needs, then validate the result for its intended use.
- Before flying in Canada, confirm airspace, permissions, and current Transport Canada requirements.
What does creating a 3D model from drone photos involve?
Creating a 3D model from drone photos means using overlapping photographs to reconstruct information about a subject’s shape and surface. It’s a photogrammetry workflow, not a single automated action: image capture, processing, quality checks, and export are distinct stages. The science of photogrammetry explains how measurements and spatial information can be derived from photographs.
The intended deliverable shapes decisions at every stage. A model for visual communication may prioritize a convincing appearance, while a measurement-oriented project needs suitable image coverage, processing, and reference information. Before planning the capture, decide what the output must show or support, who will use it, and which file type they need. That helps you avoid collecting images that look useful but don’t contain enough information for the job.
A single aerial photograph shows a scene from one viewpoint; a 3D model represents reconstructed surfaces using information matched across multiple viewpoints.
How photogrammetry turns photographs into a model
Software commonly begins with Structure-from-Motion (SfM). It identifies visual features shared between images and uses them to estimate camera positions and the scene’s geometry. Multi-View Stereo (MVS) can then use matched views to estimate denser surface information. Results depend on the images and processing, so reconstruction isn’t guaranteed to be complete or correct.
A point cloud is a collection of points representing estimated locations on visible surfaces. A mesh connects points into a surface made of small shapes, which may then be textured with image colour and detail. These are different representations of the reconstructed scene, not proof that every surface has been captured accurately.
What a drone-photo model can and cannot tell you
A textured model can help people understand a structure or site visually. Surface reconstruction can represent visible geometry, while measurement-oriented use requires suitable capture and validation for the task. A model’s appearance alone doesn’t establish that its dimensions or coordinates are reliable.
Photogrammetry can’t reliably reconstruct details that aren’t present in the images. A roof overhang, the underside of a structure, or a surface hidden by trees may be missing, incomplete, or estimated by the software. Gaps and distortions can also arise when images don’t provide consistent views of a feature.
Accuracy depends on the full workflow: capture quality and coverage, processing choices, reference data where required, and the model’s intended use. Inspect the output for missing areas and irregular surfaces, then confirm that its limitations are acceptable for the decision it will support. If the work requires dependable measurements, seek appropriate expertise rather than relying on visual appearance alone.
How to capture drone photos for a 3D model
A dependable image set comes from a planned sequence, not a quick pass over the subject. Before takeoff, define what must be represented and how the finished model will be used. Then plan coverage, capture the required views, and check the images while you’re still on site. This order helps reveal gaps early, when you may still be able to capture the missing detail safely and within the flight plan.
Plan image coverage, overlap, and camera angles
Map out the subject and the surfaces the model needs to include. Straight-down, or nadir, photos are useful for roofs, terrain, and other broad horizontal surfaces. For a building, add oblique views from different sides to show façades and other vertical features.
Oblique views add the side-surface detail that straight-down images can’t show. Plan the route and camera direction so the subject appears with shared visual detail in multiple photographs. Overlap means that the same features appear in neighbouring photographs; processing software uses those shared details to match images. The right overlap and camera angles depend on the software, subject, and mission, so check the processing guidance rather than treating a particular percentage or angle as universal.
Adjust flight altitude, distance, and image density to the subject and required detail. A broad site may call for consistent coverage across a large area, while a structure may need closer, varied views to capture its sides. Keep the flight plan within safe operating limits and confirm current requirements before flying. Autodesk’s overview of reality capture software offers further context on tools used to turn captured data into digital representations.
Capture a complete, consistent image set
During the flight, maintain a steady capture pattern and keep exposure, focus, and image quality consistent where conditions and equipment allow. Capture from multiple viewpoints, but don’t trade safe, lawful operation for a missing angle. Careful planning and consistent execution are core drone skills; online and in-person drone training can help pilots build a more disciplined approach to flight operations.
Before leaving, compare the images with your coverage plan. Look for:
- Blur: Check that important features appear sharp.
- Glare or inconsistent exposure: Note images where strong reflections or lighting changes obscure detail.
- Coverage gaps: Confirm that planned surfaces appear in multiple useful views.
- Hidden areas: Identify parts blocked by trees, overhangs, or other obstructions. Don’t assume processing can recreate details the camera didn’t capture.
Finding a gap on site gives you a chance to reassess the plan and capture additional views if it’s safe and permitted. This check can help you catch a problem while you still have the opportunity to address it, rather than discovering an incomplete model after processing.
How to process drone photos and assess 3D model quality
Processing turns a captured image set into a usable deliverable, but software can’t compensate for every weakness in the photos. A typical workflow is to organize the files, import or upload them, review camera information, run processing, inspect the results, and export the required output. An academic study on 3D model generation describes stages such as image processing, dense point-cloud generation, and accuracy assessment.
Check the image files before processing. EXIF metadata can include camera details and image information that help software interpret the photographs. If metadata is missing, incomplete, or incorrect, check the software’s guidance and correct or supply information where needed. Don’t assume a successful processing run confirms that every input was interpreted properly.
Choose processing software based on the required output
Compare tools by ease of use, supported image formats, processing controls, and export options. Confirm that the software supports your subject scale and intended deliverable, and check current capabilities directly with the provider. Cloud services may simplify importing and processing, while desktop tools may offer different controls. Those are product-specific differences, not universal rules of photogrammetry.
Select the output for its purpose. A point cloud represents visible surfaces as many spatial points and can support detailed inspection or further analysis. A textured mesh connects points into a surface and adds image colour, making it useful for viewing a structure or object. An orthomosaic is a geometrically corrected, map-like image suited to viewing horizontal areas from above. These deliverables aren’t interchangeable; choose according to how the result will be used and what the receiving software can open.
Inspect gaps, distortion, and scale limitations
Review the result at different angles and zoom levels. Look for holes, stretched textures, duplicated surfaces, and edges that appear soft or badly reconstructed. A roofline may look convincing from above but show distortions along its edges when viewed from the side. Note each issue and, if the source images allow, consider adjusting processing settings or capturing additional coverage.
A visually complete model isn’t necessarily a model verified for measurement. Appearance alone can’t establish positional or dimensional accuracy. If measurements matter, ground control points or independent checks may help validate the result, but the appropriate method depends on the project and required confidence. Specify how accuracy will be assessed before processing begins.
Finish by exporting the appropriate file type and checking that it opens correctly in the intended application. Keep the original images and document the processing choices, limitations, and any validation performed. That record helps others understand what the model can support and where caution is needed.
Which drone-photo 3D workflow fits your project?
The right workflow depends on what the model must show and what decisions it will support. A single structure and a broad site need different image coverage, and a model for visual communication doesn’t automatically meet measurement requirements. Before creating a 3D model from drone photos, agree on the subject, deliverable, file format, and validation expectations with the person who will use it.
| Project goal | Image coverage to plan | Possible output | Validation to consider |
|---|---|---|---|
| Show a single building | Capture visible roof areas and façades from useful viewpoints; account for trees, overhangs, and other obstructions. | Textured mesh for an interactive visual representation | Check for missing sides, distorted edges, and whether any requested dimensions need independent verification. |
| Represent a broader site | Plan consistent coverage across the area and its boundaries, including relevant surface changes. | Point cloud for downstream spatial analysis, or an orthomosaic for a map-like overhead view | Confirm coordinate, scale, and measurement expectations before capture and processing. |
| Document a complex subject | Identify hidden surfaces in advance and consider which viewpoints are safe and permitted. | A mesh or point cloud, depending on how the result will be used | Review occluded areas and assess whether the captured data supports the intended decisions. |
Match the capture plan to the subject
For a building, don’t plan around the roof alone if the model needs to show façades. Check what may block the camera’s view and identify safe viewpoints before flying. Across a larger site, organize coverage so the area and its boundaries are represented consistently. For irregular or complex subjects, list hidden surfaces beforehand; if they can’t be seen safely, the model may not represent them reliably.
Match the deliverable to the intended use
A textured mesh suits interactive viewing and visual communication. A point cloud may suit later analysis that uses individual spatial points. An orthomosaic can be appropriate when the main requirement is a corrected overhead image. Confirm file compatibility with the recipient, along with accuracy and measurement expectations. If the model only needs to communicate general appearance, visual review may be enough; if people will rely on measurements, arrange appropriate checks rather than judging by appearance alone.
Before committing to a flight or processing workflow, confirm:
- What surfaces and boundaries must appear in the result?
- Which output and file format does the recipient need?
- Will the model support visual review, measurements, or both?
- What validation is required, and can the subject be captured safely?
Disciplined planning and piloting support consistent image capture. Explore drone training options if you’re looking to strengthen your flight-planning skills.
A practical next-step checklist for creating a 3D model from drone photos
A clear brief and a small test run can prevent avoidable problems before you commit to a larger mission. Use this sequence to move from project requirements to a reviewed, delivered model. Adjust the plan to the subject, intended output, and conditions on site.
Use this pre-flight and processing checklist
- Define the project. Record the model’s purpose, the area or object to capture, the expected output, and any accuracy or measurement expectations. Confirm these requirements with whoever will use the model.
- Confirm flight arrangements. Check airspace, permissions, safe operating conditions, and current Transport Canada requirements before flying. Consider site access and any obstacles that could affect the planned viewpoints.
- Prepare the equipment and files. Check that the drone and camera are ready for the planned capture. Confirm you have enough image storage and a clear method for organizing and backing up the photographs.
- Plan and test. Set out the intended coverage and viewpoints. Capture a small sample that represents the subject, then import and process those images using the software you expect to use.
- Review the test result. Check whether the sample includes the necessary surfaces and whether processing reveals gaps, blur, or distortion. If the result falls short, adjust the image coverage or workflow before expanding the mission.
- Complete the capture and process the full set. Follow the revised plan, organize the images, process them, and inspect the model against the original project requirements.
- Validate and deliver. Confirm the output format with the recipient. Document relevant limitations and any checks performed, especially if the model will inform measurements or decisions.
A test capture is not a substitute for a complete mission, but it can show whether the planned approach and processing sequence are suitable before you scale up. If the model needs to support measurement, agree on validation expectations early rather than relying on visual appearance alone.
When professional drone support may help
Structured training can help pilots strengthen flight planning and aerial image capture skills. If you need professionally captured drone imagery rather than guidance for your own capture, aerial photography and video services may be relevant. Caswell Aviation Ltd offers online and in-person drone training, as well as drone aerial photography and video services. Explore drone training and aerial imagery services.
Plan your next capture with confidence
Creating a 3D model from drone photos is a sequence of informed decisions, from defining the intended use to reviewing the finished output. Consistent image coverage gives processing software useful visual information, while the right deliverable depends on whether you need a visual representation, spatial data, or a basis for measurement. A small test capture and processing run can help you refine your plan before taking on a larger project.
Before flying, confirm the required coverage, output format, and validation expectations. Then check airspace, permissions, and current Transport Canada requirements. These steps help you assess whether the model is suitable for its purpose, or whether its limitations call for further checks or expert support.
If you’d like to strengthen your flight planning and image capture skills, Caswell Aviation Ltd offers online and in-person drone training. For professional drone imagery, the company also provides aerial photography and video services. Explore drone training and aerial imagery services.
With a clear brief and a disciplined approach, you can make the next step practical and purposeful.
Frequently Asked Questions
Can you create a 3D model from any drone photos?
No, not every set of drone photos contains enough clear, overlapping detail to produce a useful model. Images should show the same features from multiple viewpoints and be sharp enough for processing software to match them. Photos with blur, glare, large gaps, or obscured surfaces can lead to incomplete or distorted results. Creating a 3D model from drone photos works best when image coverage is planned around the subject and the model’s intended use.
How many drone photos do you need to create a 3D model?
There’s no fixed photo count that suits every project. The number depends on the subject’s size and complexity, the level of detail required, the viewpoints available, and the processing software. A small object and a broad site need different coverage. Aim to capture consistent, overlapping views of every surface the model must represent, then test a sample set in your chosen software before committing to a larger capture.
Are oblique photos necessary for a drone 3D model?
Not always, but oblique photos are often needed to show vertical surfaces. Straight-down, or nadir, images are useful for roofs, terrain, and other horizontal areas. Angled views can add detail from building façades, sides, and features hidden from above. Choose camera angles according to the subject and required output. For a building model that must include its walls, relying only on overhead photos is unlikely to provide complete coverage.
What software can process drone photos into a 3D model?
Photogrammetry software can align drone images, reconstruct visible surfaces, and produce outputs such as point clouds or textured meshes. Options include desktop applications and cloud-based platforms. For example, Agisoft Metashape, Pix4Dmapper, and DroneDeploy are tools used for image-based mapping and modelling workflows. Compare supported image formats, processing controls, export options, ease of use, and suitability for your project. Check each provider’s current capabilities before selecting software.
How accurate is a 3D model made from drone photos?
Accuracy varies with image quality and coverage, processing choices, reference information, and the model’s intended use. A model may look complete but still have unreliable dimensions or position. For visual communication, inspecting surfaces and gaps may be sufficient. If measurements or location data will guide decisions, clarify accuracy expectations and consider suitable validation, such as ground control or independent checks. Use qualified support if the required confidence exceeds your ability to verify.
Can drone photos create a 3D model of a building?
Yes, drone photos can support a 3D building model if they show the surfaces that need to be represented. Overhead views can capture roof areas, while oblique images help show façades and other vertical details. Plan for obstructions such as trees, balconies, and roof overhangs, which can hide surfaces from the camera. Areas absent from the photographs may remain incomplete, so inspect the model and assess whether it meets the project’s purpose.
What file format should a drone 3D model use?
Choose a format based on the deliverable and the software or platform that will use it. A textured mesh, point cloud, or orthomosaic serves a different purpose, and not every recipient’s system accepts the same files. Ask the recipient which format, coordinate reference, texture, and supporting information they require before processing and export. Confirm compatibility with a test file where possible, especially if the model must be shared or used in another application.
Leave a comment